collage with goth nail designs

Calling all darklings, night owls, and lovers of the unconventional! Does your heart sing for a manicure that's as bold and dramatic as your soul? While Halloween nails definitely capture some gothic vibes, we can't be rocking them all year round, especially when there are so many undiscovered dark-themed designs waiting to be explored. Let's ditch the orange pumpkins and embrace the allure of truly goth nail designs.

Here are five killer ideas that combine the edgy spirit of goth with a touch of unexpected prettiness. Get ready to turn heads and unleash your inner darkness (in the most stylish way possible, of course).

Goth Aesthetic + Nail Art 


Goth nail art embodies the dark and dramatic spirit of the subculture. Deep, sultry colors like black, crimson, and midnight blue form the base, often accented with bold patterns like spiderwebs, crosses, or even delicate lace. While the overall look leans dark, a touch of elegance keeps it from being purely macabre. Think shimmering metallics, intricate nail art designs, or even a single, perfectly placed jewel for a touch of unexpected refinement.

close up of two womans hands with Stained Glass Nails
by @chaunlegend

  • #1. Stained Glass Nails: 


Clear base with intricate stained glass pattern, inspired by the holy vitrage in the church.

Let's start with an alluring, vitrage-inspired nail look for all the Church Aesthetic appreciators. Get the look by playing with vibrant jewel tones and metallic outlines to create the illusion of miniature stained glass masterpieces on each nail. This dazzling look is sure to turn heads but be warned – achieving those perfect details requires a steady hand and some nail art practice, making it best suited for the more experienced nail enthusiast.

How to Create the Stained Glass Effect on Your Nails

Translucent foundation: Apply a thin layer of clear or slightly translucent nail polish as the base for your stained glass design. Let it dry completely.

Web of colors:  Using your thin nail art brush, carefully paint a network of geometric shapes and lines on your nails. Play with different colors and experiment with creating sections of varying sizes.

Metallic accents (optional):  For an extra touch of stained glass authenticity, dip your dotting tool (or the tip of your thin brush) in a metallic polish and add small dots or outlines to your colored sections.

Filling the gaps: Once your web of lines is complete, use your chosen colors to fill in the sections you created. Be patient and use thin layers for better control.

Seal the deal:  After everything is dry, apply a generous layer of top coat to protect your artwork and add a beautiful shine.

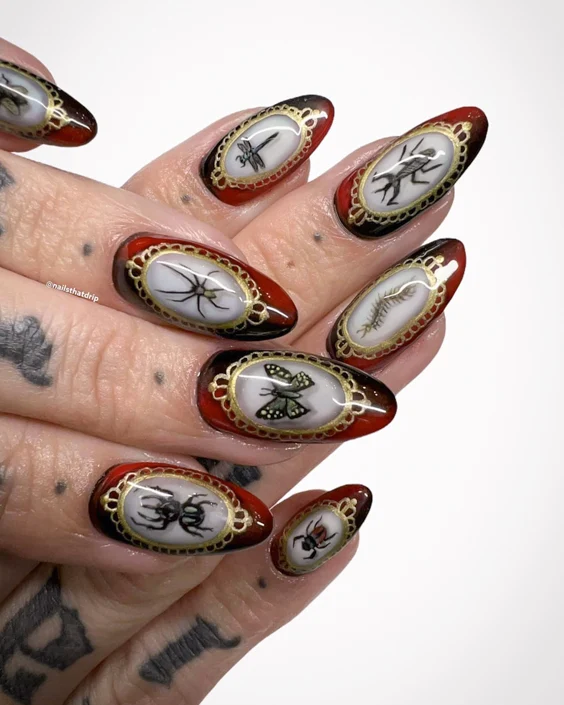
close up of two womans hands with Insectarium Exhibition Nail Design for goths
by Superset Nail Design

#2. Insectarium Exhibition Nail Design: 


Deep red and black base with a gold oval shape and a small insect on a white background.

If stained glass nails don't appeal to you, try to channel your inner entomologist with the captivating "Insectarium Exhibition" nail design. Imagine a museum display brought to life at your fingertips. Start with a base of deep, luxurious red – a color reminiscent of the plush velvet lining in antique insect displays. Then, on each nail, paint a bold black oval in the center, creating a window into a miniature world. 

Paint a delicate white background, and then the star of the show – a tiny, intricately detailed insect. Choose a realistic beetle, a graceful butterfly, or a curious spider – the possibilities are endless. 

How to Create the Insectarium Nails

Prepped and Polished: Apply a base coat to clean, and dry nails. Let it dry completely, then paint two thin coats of your deep red polish for an opaque and luxurious base.

The Insectarium Window: Using your black polish and a thin nail art brush, carefully paint a clean oval shape in the center of each nail. This will act as the "window" into your miniature insect exhibit. Let the black dry completely.

A Blank Canvas: Within the black oval, use your white polish to create a small, clean rectangle or circle as the background for your insect.

Star of the Show: Now comes the fun part!  Using your thin nail art brush, meticulously paint a small insect of your choice onto the white background. You can find inspiration online or in insect field guides for realistic details.

Metallic Accents (Optional): For an extra touch of realism and dimension, grab your dotting tool (or the tip of a bobby pin) and dip it into your gold polish. Carefully add tiny dots for details like eyes or spots on the wings of your insect.

Seal the Deal: Once everything is completely dry, apply a generous layer of top coat to protect your miniature insectarium and add a beautiful glossy finish.

*Extra tip: Take your Insectarium-inspired goth nails to the next level by incorporating subtle 3D elements. After painting the base insect, use a dotting tool and a metallic gold polish to create tiny, raised dots for details like eyes or spots on the wings. 

close up of two womans hands with  Joan of Arc Nail Look for Orléans' Goths design

#3. Joan of Arc Nail Look for Orléans' Goths:


See-through stiletto nails with "stainless steel" swords painted on.

The next goth look is giving out a medical, slightly aggressive, but romantically beautiful vibe. I called them Joan of Arc nails and I love this look so much! I wish my hands were steady, so I could re-create this design on my sharpies. 

How to Create the Joan of Arc Nail Design?

Prep is Key:  Start with clean, dry nails. Gently push back your cuticles and apply a base coat for better polish adherence.  Let it dry completely.  For an extra touch of subtle color, you can apply one thin coat of clear or sheer nude polish after the base coat dries. 

Stiletto Statement: If you don't already have stiletto nails, consider getting them shaped professionally for this look. You can also use acrylic or press-on nails in a stiletto shape if that's more convenient. 

Sword Art: Here comes the fun part! Using your thin nail art brush and the chrome or holographic silver polish, carefully paint the silhouette of a sword on each nail. Aim for a long, slender shape that tapers towards the tip, mimicking a medieval blade. 

*Beginner Tip: If you're not confident in freehand drawing, you can find nail art stencils online that feature sword designs. Simply apply the stencil to your nail, paint over it with your silver polish, and then carefully peel off the stencil for a clean design. 

Polish and Shine: Once the sword art is dry, apply a top coat (optional) for added protection and a beautiful glossy finish.

close up of two womans hands with Black Intricate Lace design

#4. Black Intricate Lace on Purple Nails:


Muted, matte-purple base with a thin, intense-black lace woven on top.

Just check out this captivating blend of elegance and gothic edge. A base of muted, matte purple – a color that whispers of twilight skies and hidden secrets. This velvety backdrop will be the canvas for an exquisite masterpiece. Somewhat less dramatic, and more daytime-appropriate!

How to Create Black Lace Nail Design?

Prep and Prime: Apply a base coat to clean, dry nails and let it dry completely. This will help with polish adherence and prevent chipping.

Muted Majesty: Paint two thin coats of your matte purple nail polish, ensuring even coverage for a smooth and opaque finish. Dry each nail polish coat completely before the next.

Weaving the Lace: Here comes the intricate part! Using your thin nail art brush, carefully paint a design resembling black lace onto each nail. You can create delicate floral patterns, swirling vines, geometric shapes, or even find inspiration from real lace patterns online.

Beginner Tip: If you're new to nail art or find freehand drawing challenging, consider using a stamping kit. You can find nail stamping plates with intricate lace designs that can be easily transferred onto your nails using a stamper and scraper.

Level Up Your Lace (Optional): For a truly detailed look, especially with very intricate designs, you can utilize a detailing brush. This allows for even finer lines and sharper details compared to a regular nail art brush.

Seal the Deal (Optional): Since the look utilizes a matte purple base, you may prefer to keep the overall finish matte. However, if you desire a bit of shine, apply a thin layer of top coat after everything is dry. This will also help protect your intricate lace design.

close up of two womans hands with Nephrite and Silver Goth look

  • #5. Nephrite and Silver Goth Nails:


Marble-like, milky-green base with white "veins" and silver crosses, blings, and raw gems all over the nails.

And, lastly, here are Nephrite and Silver goth nails, for those who like nature's gifts and drama! This mesmerizing look draws inspiration from the beauty and mystery of nephrite jade, a stone prized for its ethereal green hues and connection to the spirit world in many cultures. Delicate silver crosses, tiny sparkling "blings" (small rhinestones or studs), and even small, raw nephrite chips can be incorporated, creating a sense of both luxury and raw, dark aesthetic.

How to Create Nephrite and Silver Goth Nails?

Prep and Base: Apply a base coat to clean it and let it dry completely.

Milky Jade Canvas: Paint two thin coats of your milky green nail polish, ensuring even coverage for an opaque and smooth base that resembles polished nephrite jade. Let each coat dry completely before applying the next.

Swirling Veins: Using your thin nail art brush and white nail polish, carefully paint thin, wispy lines across each nail. These lines should resemble veins or natural markings within the stone and can be swirled or left relatively straight – there's no need for perfect symmetry here!

Silver Accents (Optional): If you want to incorporate silver crosses, dip your thin nail art brush in silver polish and carefully draw small crosses on specific nails or accentuate the white vein intersections with tiny silver dots.

Bling It On: Now comes the fun part – adding the gothic touch!  Using tweezers, carefully pick up small silver rhinestones or studs and place them strategically on your nails. Play with size and placement for a unique look.

*Tip: Apply a tiny dot of top coat to the back of each rhinestone or stud before placing it for better adhesion.

Raw Beauty (Optional): For an extra dose of gothic flair and to mimic the inclusion of raw gemstones, use tweezers to gently place a few tiny crushed nephrite chips onto your nails.  Press them lightly into the polish to ensure they adhere.

Seal the Deal: Once everything is dry and in place, apply a generous layer of top coat to seal your design and protect all the embellishments. This will also create a beautiful, glossy finish.

Let's Wrap Up...


So there you have it, darklings! Five killer goth nail designs that combine the boldness you crave with a touch of unexpected prettiness. With a little practice and the tutorials provided, you can transform your fingertips into mini works of gothic art
  • May 01, 2024

Goth Nail Designs: 5 Edgy, but Pretty Ideas for All the Darklings (with Tutorials!)

collage with goth nail designs

Calling all darklings, night owls, and lovers of the unconventional! Does your heart sing for a manicure that's as bold and dramatic as your soul? While Halloween nails definitely capture some gothic vibes, we can't be rocking them all year round, especially when there are so many undiscovered dark-themed designs waiting to be explored. Let's ditch the orange pumpkins and embrace the allure of truly goth nail designs.

Here are five killer ideas that combine the edgy spirit of goth with a touch of unexpected prettiness. Get ready to turn heads and unleash your inner darkness (in the most stylish way possible, of course).

Goth Aesthetic + Nail Art 


Goth nail art embodies the dark and dramatic spirit of the subculture. Deep, sultry colors like black, crimson, and midnight blue form the base, often accented with bold patterns like spiderwebs, crosses, or even delicate lace. While the overall look leans dark, a touch of elegance keeps it from being purely macabre. Think shimmering metallics, intricate nail art designs, or even a single, perfectly placed jewel for a touch of unexpected refinement.

close up of two womans hands with Stained Glass Nails
by @chaunlegend

  • #1. Stained Glass Nails: 


Clear base with intricate stained glass pattern, inspired by the holy vitrage in the church.

Let's start with an alluring, vitrage-inspired nail look for all the Church Aesthetic appreciators. Get the look by playing with vibrant jewel tones and metallic outlines to create the illusion of miniature stained glass masterpieces on each nail. This dazzling look is sure to turn heads but be warned – achieving those perfect details requires a steady hand and some nail art practice, making it best suited for the more experienced nail enthusiast.

How to Create the Stained Glass Effect on Your Nails

Translucent foundation: Apply a thin layer of clear or slightly translucent nail polish as the base for your stained glass design. Let it dry completely.

Web of colors:  Using your thin nail art brush, carefully paint a network of geometric shapes and lines on your nails. Play with different colors and experiment with creating sections of varying sizes.

Metallic accents (optional):  For an extra touch of stained glass authenticity, dip your dotting tool (or the tip of your thin brush) in a metallic polish and add small dots or outlines to your colored sections.

Filling the gaps: Once your web of lines is complete, use your chosen colors to fill in the sections you created. Be patient and use thin layers for better control.

Seal the deal:  After everything is dry, apply a generous layer of top coat to protect your artwork and add a beautiful shine.

close up of two womans hands with Insectarium Exhibition Nail Design for goths
by Superset Nail Design

#2. Insectarium Exhibition Nail Design: 


Deep red and black base with a gold oval shape and a small insect on a white background.

If stained glass nails don't appeal to you, try to channel your inner entomologist with the captivating "Insectarium Exhibition" nail design. Imagine a museum display brought to life at your fingertips. Start with a base of deep, luxurious red – a color reminiscent of the plush velvet lining in antique insect displays. Then, on each nail, paint a bold black oval in the center, creating a window into a miniature world. 

Paint a delicate white background, and then the star of the show – a tiny, intricately detailed insect. Choose a realistic beetle, a graceful butterfly, or a curious spider – the possibilities are endless. 

How to Create the Insectarium Nails

Prepped and Polished: Apply a base coat to clean, and dry nails. Let it dry completely, then paint two thin coats of your deep red polish for an opaque and luxurious base.

The Insectarium Window: Using your black polish and a thin nail art brush, carefully paint a clean oval shape in the center of each nail. This will act as the "window" into your miniature insect exhibit. Let the black dry completely.

A Blank Canvas: Within the black oval, use your white polish to create a small, clean rectangle or circle as the background for your insect.

Star of the Show: Now comes the fun part!  Using your thin nail art brush, meticulously paint a small insect of your choice onto the white background. You can find inspiration online or in insect field guides for realistic details.

Metallic Accents (Optional): For an extra touch of realism and dimension, grab your dotting tool (or the tip of a bobby pin) and dip it into your gold polish. Carefully add tiny dots for details like eyes or spots on the wings of your insect.

Seal the Deal: Once everything is completely dry, apply a generous layer of top coat to protect your miniature insectarium and add a beautiful glossy finish.

*Extra tip: Take your Insectarium-inspired goth nails to the next level by incorporating subtle 3D elements. After painting the base insect, use a dotting tool and a metallic gold polish to create tiny, raised dots for details like eyes or spots on the wings. 

close up of two womans hands with  Joan of Arc Nail Look for Orléans' Goths design

#3. Joan of Arc Nail Look for Orléans' Goths:


See-through stiletto nails with "stainless steel" swords painted on.

The next goth look is giving out a medical, slightly aggressive, but romantically beautiful vibe. I called them Joan of Arc nails and I love this look so much! I wish my hands were steady, so I could re-create this design on my sharpies. 

How to Create the Joan of Arc Nail Design?

Prep is Key:  Start with clean, dry nails. Gently push back your cuticles and apply a base coat for better polish adherence.  Let it dry completely.  For an extra touch of subtle color, you can apply one thin coat of clear or sheer nude polish after the base coat dries. 

Stiletto Statement: If you don't already have stiletto nails, consider getting them shaped professionally for this look. You can also use acrylic or press-on nails in a stiletto shape if that's more convenient. 

Sword Art: Here comes the fun part! Using your thin nail art brush and the chrome or holographic silver polish, carefully paint the silhouette of a sword on each nail. Aim for a long, slender shape that tapers towards the tip, mimicking a medieval blade. 

*Beginner Tip: If you're not confident in freehand drawing, you can find nail art stencils online that feature sword designs. Simply apply the stencil to your nail, paint over it with your silver polish, and then carefully peel off the stencil for a clean design. 

Polish and Shine: Once the sword art is dry, apply a top coat (optional) for added protection and a beautiful glossy finish.

close up of two womans hands with Black Intricate Lace design

#4. Black Intricate Lace on Purple Nails:


Muted, matte-purple base with a thin, intense-black lace woven on top.

Just check out this captivating blend of elegance and gothic edge. A base of muted, matte purple – a color that whispers of twilight skies and hidden secrets. This velvety backdrop will be the canvas for an exquisite masterpiece. Somewhat less dramatic, and more daytime-appropriate!

How to Create Black Lace Nail Design?

Prep and Prime: Apply a base coat to clean, dry nails and let it dry completely. This will help with polish adherence and prevent chipping.

Muted Majesty: Paint two thin coats of your matte purple nail polish, ensuring even coverage for a smooth and opaque finish. Dry each nail polish coat completely before the next.

Weaving the Lace: Here comes the intricate part! Using your thin nail art brush, carefully paint a design resembling black lace onto each nail. You can create delicate floral patterns, swirling vines, geometric shapes, or even find inspiration from real lace patterns online.

Beginner Tip: If you're new to nail art or find freehand drawing challenging, consider using a stamping kit. You can find nail stamping plates with intricate lace designs that can be easily transferred onto your nails using a stamper and scraper.

Level Up Your Lace (Optional): For a truly detailed look, especially with very intricate designs, you can utilize a detailing brush. This allows for even finer lines and sharper details compared to a regular nail art brush.

Seal the Deal (Optional): Since the look utilizes a matte purple base, you may prefer to keep the overall finish matte. However, if you desire a bit of shine, apply a thin layer of top coat after everything is dry. This will also help protect your intricate lace design.

close up of two womans hands with Nephrite and Silver Goth look

  • #5. Nephrite and Silver Goth Nails:


Marble-like, milky-green base with white "veins" and silver crosses, blings, and raw gems all over the nails.

And, lastly, here are Nephrite and Silver goth nails, for those who like nature's gifts and drama! This mesmerizing look draws inspiration from the beauty and mystery of nephrite jade, a stone prized for its ethereal green hues and connection to the spirit world in many cultures. Delicate silver crosses, tiny sparkling "blings" (small rhinestones or studs), and even small, raw nephrite chips can be incorporated, creating a sense of both luxury and raw, dark aesthetic.

How to Create Nephrite and Silver Goth Nails?

Prep and Base: Apply a base coat to clean it and let it dry completely.

Milky Jade Canvas: Paint two thin coats of your milky green nail polish, ensuring even coverage for an opaque and smooth base that resembles polished nephrite jade. Let each coat dry completely before applying the next.

Swirling Veins: Using your thin nail art brush and white nail polish, carefully paint thin, wispy lines across each nail. These lines should resemble veins or natural markings within the stone and can be swirled or left relatively straight – there's no need for perfect symmetry here!

Silver Accents (Optional): If you want to incorporate silver crosses, dip your thin nail art brush in silver polish and carefully draw small crosses on specific nails or accentuate the white vein intersections with tiny silver dots.

Bling It On: Now comes the fun part – adding the gothic touch!  Using tweezers, carefully pick up small silver rhinestones or studs and place them strategically on your nails. Play with size and placement for a unique look.

*Tip: Apply a tiny dot of top coat to the back of each rhinestone or stud before placing it for better adhesion.

Raw Beauty (Optional): For an extra dose of gothic flair and to mimic the inclusion of raw gemstones, use tweezers to gently place a few tiny crushed nephrite chips onto your nails.  Press them lightly into the polish to ensure they adhere.

Seal the Deal: Once everything is dry and in place, apply a generous layer of top coat to seal your design and protect all the embellishments. This will also create a beautiful, glossy finish.

Let's Wrap Up...


So there you have it, darklings! Five killer goth nail designs that combine the boldness you crave with a touch of unexpected prettiness. With a little practice and the tutorials provided, you can transform your fingertips into mini works of gothic art
aesthetic ice cubes with flowers inside
Photo: Işıl

Whether it's a nagging ache or a sudden injury, pain can derail our lives. It's no wonder people seek quick solutions. Heat and ice are common go-to remedies, but the information swirling around these methods can be confusing. Should you get a heating pad or an ice pack? Each technique is beneficial but for specific issues or in combination. For persistent pain, you can schedule an appointment for physical therapy. Still, knowing how to use thermal therapy is beneficial for run-of-the-mill injuries and inflammation.

What is Thermal Therapy?


Thermal therapy, also known as heat therapy, is a treatment that uses heat to promote healing and pain relief in the body. By applying heat to targeted areas, like sore muscles or stiff joints, thermal therapy increases blood flow. This improved circulation delivers oxygen and nutrients to the tissues, which aids in the healing process. Additionally, the warmth helps to relax tense muscles and eases pain signals, providing much-needed comfort.

Thermal therapy comes in many forms, from simple heating pads and hot water bottles to paraffin wax baths and saunas.  Some physiotherapists even use ultrasound, which generates deep heat within the tissues.  This versatility allows thermal therapy to be a valuable tool for managing a variety of conditions, from chronic pain to sports injuries.

ice pack applied to the leg
Photo: Vidal Balielo Jr.

Heat or Ice? Sorting Facts from Fiction


One pervasive misconception is that ice is always best for injuries. While ice is invaluable for acute pain and swelling, heat is powerful for chronic pain, muscle stiffness, and warming up tight joints before exercise. Understanding when to use each is key. A physical therapist can help you determine when you should use each method, but it is also helpful to understand the purpose behind each treatment.

  • The Science Behind Thermal Relief Methods

Heat works its magic by dilating blood vessels, boosting circulation to the sore area. This helps flush out inflammatory waste products and promotes healing. Warmth also relaxes tight muscles and can lessen the intensity of pain signals traveling to your brain.

Cold therapy, on the other hand, constricts blood vessels, reducing inflammation and swelling. It can temporarily numb nerve endings, offering a sense of relief.

  • Beyond the Basics: Other Thermal Therapies

While heating pads and ice packs are readily available, your physical therapist, working physical therapy Monroe, NJ, may utilize other thermal therapies. Ultrasound sends sound waves deep into tissues, generating gentle heat to reduce pain. Paraffin wax baths offer soothing warmth for hands and feet, often helpful for arthritis pain. Contrast baths (alternating hot and cold water) can stimulate circulation and reduce swelling.

  • Precautions and When to Consult a Pro

It's important to use thermal therapy wisely. Prolonged exposure to heat or ice can damage the skin, causing burns or frostbite. Those with sensory issues or certain medical conditions should take special precautions. If your pain is severe or persistent, or you have underlying conditions, don't self-treat. Consult a doctor or use physical therapy Northfield, NJ. Your physical therapist can tailor a plan that maximizes the benefits of thermal therapy while minimizing risks.

Heat and ice are simple yet remarkably effective tools for managing pain and inflammation. Knowing when to use each puts you in control of your treatment. However, sometimes guidance from a professional is helpful and required. Remember, pain relief is rarely one-size-fits-all. By understanding thermal therapy and consulting with your physical therapist, you can develop a comprehensive treatment plan to help you feel your best and return to the activities you love.

Final Thoughts...


PT is all about individualized care. A therapist will tailor a treatment plan to your specific needs. They may integrate other therapies into your treatment and use thermal therapy for maximum benefit. If you are experiencing pain and need help deciding on heat or cold, contact a local physical therapist and schedule a consultation.
  • April 29, 2024

Thermal Therapy for Pain Relief: Myths Busted & Benefits Explained

aesthetic ice cubes with flowers inside
Photo: Işıl

Whether it's a nagging ache or a sudden injury, pain can derail our lives. It's no wonder people seek quick solutions. Heat and ice are common go-to remedies, but the information swirling around these methods can be confusing. Should you get a heating pad or an ice pack? Each technique is beneficial but for specific issues or in combination. For persistent pain, you can schedule an appointment for physical therapy. Still, knowing how to use thermal therapy is beneficial for run-of-the-mill injuries and inflammation.

What is Thermal Therapy?


Thermal therapy, also known as heat therapy, is a treatment that uses heat to promote healing and pain relief in the body. By applying heat to targeted areas, like sore muscles or stiff joints, thermal therapy increases blood flow. This improved circulation delivers oxygen and nutrients to the tissues, which aids in the healing process. Additionally, the warmth helps to relax tense muscles and eases pain signals, providing much-needed comfort.

Thermal therapy comes in many forms, from simple heating pads and hot water bottles to paraffin wax baths and saunas.  Some physiotherapists even use ultrasound, which generates deep heat within the tissues.  This versatility allows thermal therapy to be a valuable tool for managing a variety of conditions, from chronic pain to sports injuries.

ice pack applied to the leg
Photo: Vidal Balielo Jr.

Heat or Ice? Sorting Facts from Fiction


One pervasive misconception is that ice is always best for injuries. While ice is invaluable for acute pain and swelling, heat is powerful for chronic pain, muscle stiffness, and warming up tight joints before exercise. Understanding when to use each is key. A physical therapist can help you determine when you should use each method, but it is also helpful to understand the purpose behind each treatment.

  • The Science Behind Thermal Relief Methods

Heat works its magic by dilating blood vessels, boosting circulation to the sore area. This helps flush out inflammatory waste products and promotes healing. Warmth also relaxes tight muscles and can lessen the intensity of pain signals traveling to your brain.

Cold therapy, on the other hand, constricts blood vessels, reducing inflammation and swelling. It can temporarily numb nerve endings, offering a sense of relief.

  • Beyond the Basics: Other Thermal Therapies

While heating pads and ice packs are readily available, your physical therapist, working physical therapy Monroe, NJ, may utilize other thermal therapies. Ultrasound sends sound waves deep into tissues, generating gentle heat to reduce pain. Paraffin wax baths offer soothing warmth for hands and feet, often helpful for arthritis pain. Contrast baths (alternating hot and cold water) can stimulate circulation and reduce swelling.

  • Precautions and When to Consult a Pro

It's important to use thermal therapy wisely. Prolonged exposure to heat or ice can damage the skin, causing burns or frostbite. Those with sensory issues or certain medical conditions should take special precautions. If your pain is severe or persistent, or you have underlying conditions, don't self-treat. Consult a doctor or use physical therapy Northfield, NJ. Your physical therapist can tailor a plan that maximizes the benefits of thermal therapy while minimizing risks.

Heat and ice are simple yet remarkably effective tools for managing pain and inflammation. Knowing when to use each puts you in control of your treatment. However, sometimes guidance from a professional is helpful and required. Remember, pain relief is rarely one-size-fits-all. By understanding thermal therapy and consulting with your physical therapist, you can develop a comprehensive treatment plan to help you feel your best and return to the activities you love.

Final Thoughts...


PT is all about individualized care. A therapist will tailor a treatment plan to your specific needs. They may integrate other therapies into your treatment and use thermal therapy for maximum benefit. If you are experiencing pain and need help deciding on heat or cold, contact a local physical therapist and schedule a consultation.
elegant halloween decor for home
Photo: Paige Cody

Halloween décor often leans towards the cartoony or the jarringly gory. But what if you crave a more sophisticated ambiance? Something that tickles a sense of mystery and intrigue, rather than a cheap jump scare? I invite you to ditch the plastic skeletons and, embrace a hauntingly beautiful aesthetic with these 10 unique and elegant Halloween home décor ideas. 

  • #1. Embrace the Raven's Enchantment:


Crows and ravens have a long association with mystery, occult, and all things dark and aesthetic. Scatter realistic-looking raven figurines throughout your home – perched on bookshelves, peeking out from behind curtains, or even alighting on a silver candelabra for a dramatic centerpiece. Complement them with deep purple and black feathers arranged in vases or woven into garlands. For a touch of whimsy, display antique-style prints or silhouettes of ravens on your walls.

elegant halloween decor for home
Photo: Nathan J Hilton

  • #2. Glimmering Gothic Glamour:


Halloween doesn't have to be all darkness, you can easily introduce a touch of gothic glamour to your home by adding subtle metallic accents. Swap out your usual candles for black or metallic ones. Scatter glass cloches filled with metallic baubles, or arrange mercury glass votive holders on your mantelpiece. 

If you are lucky to have a fireplace at home, consider hanging elegant black spiderweb lace curtains in front of the opening. The flickering firelight will cast an enchanting glow through the lace, creating an aura of mystery and intrigue.

  • #3. The Apothecary's Allure:


Nothing sounds more Halloweenish than old-fashioned brewery or apothecary thematic. The second one is my personal favorite! Channel the spirit of a bygone apothecary by creating a collection of "spooky potions" and elixirs. You can even make real, drinkables for a thematic Halloween party.

Fill vintage apothecary jars (or even empty wine bottles) with colored water, adding a drop of food coloring for a touch of vibrancy. Label them with creative names like "Bat's Brew" or "Witches' Concoction" using elegant calligraphy or vintage-style labels.

elegant halloween decor for home
Photo: Nathan J Hilton

  • #4. A Haunted Harvest Tablescape:


Halloween and harvest season often go hand-in-hand. Elevate your dining table with a luxurious, yet spooky, tablescape. Use a deep burgundy or charcoal tablecloth as a base. Top it with a runner made of black lace or velvet. Scatter white or cream-colored candlesticks adorned with raven feathers or miniature pumpkins.

  • #5. The Spectral Silhouette Gallery:


Who needs gory monsters when you can have hauntingly beautiful silhouettes? Gather or create a collection of silhouette art depicting classic Halloween characters like witches, black cats, and jack-o-lanterns. For extra inspiration, re-watch these dark aesthetic movies and pick the characters that fit your home decor theme the most!

You can also frame these silhouettes in black or antique gold frames and arrange them on a gallery wall in your living room or hallway. For an extra touch, add battery-operated flickering tea lights behind each frame. This will cast an ethereal glow on the silhouettes.

elegant halloween decor for home
Photo: Ioana Motoc

  • #6. The Enchanted Forest Bathed in Moonlight:


Transform your entryway into a spooky, yet ethereal, enchanted forest. Drape white fairy lights from the ceiling, allowing them to cascade down like moonlight filtering through branches. Place black branches or twigs in a tall vase, and hang miniature white owls or bats from them with invisible thread. Scatter white pumpkins or gourds of various shapes and sizes on the floor. This creates a sense of wonder and mystery as guests enter your home.

  • #7. The Poetic Poetry Corner:


For literature lovers, create a spooky and sophisticated poetry corner. Drape a deep purple or emerald green throw blanket over an armchair. Stack antique books of classic gothic literature like Edgar Allan Poe or Mary Shelley on a side table. Place a raven figurine or a black cat sculpture beside the books.

elegant halloween decor for home
Photo: Oscar Calstrom

  • #8. A Masquerade Ball for One:


Embrace the theatricality of Halloween by creating a "masquerade ball for one" vignette. Drape a luxurious velvet cloth over a small table or side table. Place a vintage candelabra with black candles on top. 

Additionally, prop an ornately decorated masquerade mask against the wall behind the table. Scatter a few black and white feathers or faux pearls around the base for added drama. This small vignette adds a touch of unexpected elegance to any corner of your Halloween-themed home.

  • #9.  Floral Fantasia with a Dark Twist:


Flowers aren't just for spring! Embrace a dark and romantic floral theme for an elegant Halloween style.  Use deep red roses, black calla lilies, and deep purple orchids in simple, elegant vases.  Scatter dried flowers and foliage like poppy pods and bittersweet for added texture and a touch of the macabre. 

  • #10.  Haunted Heirlooms: 


How about creating a subtly spooky ambiance with a haunted heirloom theme? Think vintage candelabras with flickering candles or antique birdcages filled with white feathers. You can also display framed black-and-white portraits of people with enigmatic smiles or haunting eyes. For a touch of old-timey elegance drape old lace tablecloths over furniture and add antique books with worn leather covers. 

Wrapping Up...


That's all for today! With these unique and elegant Halloween decor ideas, you can create a spooky-stylish ambiance that will leave your guests spellbound. So, dim the lights, light the candles, and get ready to host a Halloween gathering that's both sophisticated and unforgettable. Happy haunting!
  • April 26, 2024

Halloween Home Decor: 10 Chic & Elegant Ideas for a Spooky-Stylish Home

elegant halloween decor for home
Photo: Paige Cody

Halloween décor often leans towards the cartoony or the jarringly gory. But what if you crave a more sophisticated ambiance? Something that tickles a sense of mystery and intrigue, rather than a cheap jump scare? I invite you to ditch the plastic skeletons and, embrace a hauntingly beautiful aesthetic with these 10 unique and elegant Halloween home décor ideas. 

  • #1. Embrace the Raven's Enchantment:


Crows and ravens have a long association with mystery, occult, and all things dark and aesthetic. Scatter realistic-looking raven figurines throughout your home – perched on bookshelves, peeking out from behind curtains, or even alighting on a silver candelabra for a dramatic centerpiece. Complement them with deep purple and black feathers arranged in vases or woven into garlands. For a touch of whimsy, display antique-style prints or silhouettes of ravens on your walls.

elegant halloween decor for home
Photo: Nathan J Hilton

  • #2. Glimmering Gothic Glamour:


Halloween doesn't have to be all darkness, you can easily introduce a touch of gothic glamour to your home by adding subtle metallic accents. Swap out your usual candles for black or metallic ones. Scatter glass cloches filled with metallic baubles, or arrange mercury glass votive holders on your mantelpiece. 

If you are lucky to have a fireplace at home, consider hanging elegant black spiderweb lace curtains in front of the opening. The flickering firelight will cast an enchanting glow through the lace, creating an aura of mystery and intrigue.

  • #3. The Apothecary's Allure:


Nothing sounds more Halloweenish than old-fashioned brewery or apothecary thematic. The second one is my personal favorite! Channel the spirit of a bygone apothecary by creating a collection of "spooky potions" and elixirs. You can even make real, drinkables for a thematic Halloween party.

Fill vintage apothecary jars (or even empty wine bottles) with colored water, adding a drop of food coloring for a touch of vibrancy. Label them with creative names like "Bat's Brew" or "Witches' Concoction" using elegant calligraphy or vintage-style labels.

elegant halloween decor for home
Photo: Nathan J Hilton

  • #4. A Haunted Harvest Tablescape:


Halloween and harvest season often go hand-in-hand. Elevate your dining table with a luxurious, yet spooky, tablescape. Use a deep burgundy or charcoal tablecloth as a base. Top it with a runner made of black lace or velvet. Scatter white or cream-colored candlesticks adorned with raven feathers or miniature pumpkins.

  • #5. The Spectral Silhouette Gallery:


Who needs gory monsters when you can have hauntingly beautiful silhouettes? Gather or create a collection of silhouette art depicting classic Halloween characters like witches, black cats, and jack-o-lanterns. For extra inspiration, re-watch these dark aesthetic movies and pick the characters that fit your home decor theme the most!

You can also frame these silhouettes in black or antique gold frames and arrange them on a gallery wall in your living room or hallway. For an extra touch, add battery-operated flickering tea lights behind each frame. This will cast an ethereal glow on the silhouettes.

elegant halloween decor for home
Photo: Ioana Motoc

  • #6. The Enchanted Forest Bathed in Moonlight:


Transform your entryway into a spooky, yet ethereal, enchanted forest. Drape white fairy lights from the ceiling, allowing them to cascade down like moonlight filtering through branches. Place black branches or twigs in a tall vase, and hang miniature white owls or bats from them with invisible thread. Scatter white pumpkins or gourds of various shapes and sizes on the floor. This creates a sense of wonder and mystery as guests enter your home.

  • #7. The Poetic Poetry Corner:


For literature lovers, create a spooky and sophisticated poetry corner. Drape a deep purple or emerald green throw blanket over an armchair. Stack antique books of classic gothic literature like Edgar Allan Poe or Mary Shelley on a side table. Place a raven figurine or a black cat sculpture beside the books.

elegant halloween decor for home
Photo: Oscar Calstrom

  • #8. A Masquerade Ball for One:


Embrace the theatricality of Halloween by creating a "masquerade ball for one" vignette. Drape a luxurious velvet cloth over a small table or side table. Place a vintage candelabra with black candles on top. 

Additionally, prop an ornately decorated masquerade mask against the wall behind the table. Scatter a few black and white feathers or faux pearls around the base for added drama. This small vignette adds a touch of unexpected elegance to any corner of your Halloween-themed home.

  • #9.  Floral Fantasia with a Dark Twist:


Flowers aren't just for spring! Embrace a dark and romantic floral theme for an elegant Halloween style.  Use deep red roses, black calla lilies, and deep purple orchids in simple, elegant vases.  Scatter dried flowers and foliage like poppy pods and bittersweet for added texture and a touch of the macabre. 

  • #10.  Haunted Heirlooms: 


How about creating a subtly spooky ambiance with a haunted heirloom theme? Think vintage candelabras with flickering candles or antique birdcages filled with white feathers. You can also display framed black-and-white portraits of people with enigmatic smiles or haunting eyes. For a touch of old-timey elegance drape old lace tablecloths over furniture and add antique books with worn leather covers. 

Wrapping Up...


That's all for today! With these unique and elegant Halloween decor ideas, you can create a spooky-stylish ambiance that will leave your guests spellbound. So, dim the lights, light the candles, and get ready to host a Halloween gathering that's both sophisticated and unforgettable. Happy haunting!
collage with rockabilly aesthetic elements for inspiration

Skinny jeans and minimalist makeup are great, of course, but how about diluting your style with some vintage-inspired vibe. The Rockabilly era filled with electrifying sounds, pompadour trends, and a full-fledged lifestyle might become a perfect inspiration for your revived look.  Whether you're a seasoned fashionista or a complete fashion newbie, today's guide is your one-stop shop for rocking this rebellious spirit! 

What is Rockabilly? 


Explaining simply, rockabilly is a genre with blue jeans and hair gel in its DNA. It's a high-octane mix of 1950s country and rhythm and blues, spiced up with matching looks. It's a high-energy mix that combines the twangy guitars and storytelling of country with the driving rhythms and soulful vocals of R&B. Imagine blues melodies given a country makeover, with a dash of that classic rock and roll energy thrown in for good measure. 

collage with rockabilly aesthetic elements for inspiration

  • The Birthplace of a Rockabilly


The 1950s American South was a pot boiling with culture. Rhythm and blues pulsated through juke joints, while country music twanged on rural radios. Young musicians, particularly those growing up in the South, began to weave these seemingly disparate sounds together. This bursting fusion, fueled by a desire for something fresh and exciting, resulted in a sound we call rockabilly. 

The driving rhythm of rock and roll collided with the storytelling spirit of the country, borrowing heavily from blues elements like the electric guitar and call-and-response vocals. Pioneering artists like Carl Perkins, Gene Vincent, and Scotty Moore laid the groundwork for this revolutionary sound, but it was a young truck driver from Mississippi named Elvis Presley who truly ignited the rockabilly flame.

  • Fashion for the Outsiders


Rockabilly wasn't just about the music; it was a visual rebellion. Men donned bold and playful looks. Bowling shirts with their bold patterns and relaxed fit became a staple, while blue jeans and slicked-back greaser hairstyles (think James Dean) conveyed a sense of cool defiance. 

Women embraced the iconic poodle skirt, a playful take on the traditional full skirt, often adorned with bold colors and playful patterns. Bettie Page, a captivating pin-up model, further solidified the rockabilly aesthetic with her signature teased hair, figure-hugging dresses, and rebellious spirit. Putting together an authentic rockabilly look is about more than just clothes; it's about capturing the attitude. Think playful confidence and a touch of vintage flair.

Rockabilly icons: Wanda Jackson, Elvis, Bettie Page

  • Popular Rockabilly Icons, Who Inspired This Style


Elvis Presley wasn't just the "King of Rock and Roll;" first and foremost he was the undisputed king of rockabilly. His electrifying stage presence, smooth vocals, and charisma defined the genre. Yet, rockabilly would never be complete without the contributions of other legends like Johnny Cash and Wanda Jackson, often dubbed the "Queen of Rockabilly".

Bettie Page, though not a musician, became a visual icon for her exceptional rockabilly aesthetic. Her playful sexuality and defiance against societal norms resonated with young women who craved a different kind of femininity.

What Are the Main Rocakbily Features?


Rockabilly isn't just catchy tunes and playful outfits; it's a distinct sound and aesthetic. For a better understanding, let's check out some of the most iconic features of this style.

  • Music:


High Energy: Rockabilly pulsates with a driving beat, often incorporating elements from rock and roll and blues. Think fast tempos, prominent backbeats, and electrifying guitar riffs.

Country Twang: Don't be fooled by the energy; rockabilly retains a strong country influence. Vocal melodies often carry a twang, and lyrics might tell stories of everyday life with a touch of Southern charm.

Boogie Woogie Blues: Piano plays a key role in rockabilly, borrowing heavily from Boogie Woogie with its rolling basslines and playful runs.

  • Fashion:


Men:

Bowling Shirts: These bold, patterned shirts in relaxed fits became a symbol of cool, replacing the formality of traditional dress shirts.

Blue Jeans: Once associated with manual labor, jeans became a badge of individuality for rockabilly men.

Greaser Hairstyles: Slicked-back pompadours with long sideburns were the go-to for a rebellious and youthful look.

Leather Jackets: A touch of bad-boy charm, leather jackets added an edge to rockabilly outfits.

Women:

Poodle Skirts: Playful and full, poodle skirts symbolized a youthful femininity that wasn't afraid to move. Vibrant colors and playful patterns added personality.

Halter Tops: Highlighting the shoulders, halter tops exuded confidence and a touch of vintage glamour.
Cat-Eye Eyeliner: A classic makeup look of the era, cat-eye, and graphic eyeliner added a touch of drama and accentuated the eyes.

Bandannas: Worn as headbands or tied around the neck, bandannas added a touch of rock and roll rebellion to feminine outfits.

Celebrities with rockabilly-inspired hair look: Katty Perry, Scarlett Johansson, Rihanna

  • Hair:


Men: As mentioned previously, greaser hairstyles dominated. But there was variety! Some men opted for a quiff, with hair swept up and forward for a touch of height.

Women: Victory rolls, with hair rolled up at the crown and pinned into place, were a popular choice. For a more relaxed look, pin curls added texture and volume.

  • The Modern Revival of Rockabilly


Rockabilly may have reached its peak in the 1950s, but its spirit never truly faded. Today, contemporary fashion embraces rockabilly elements with a modern twist. Think high-waisted jeans paired with fitted crop tops and vintage-inspired band tees. Celebrities like Katy Perry and Gwen Stefani have been spotted sporting rockabilly-inspired looks, further propelling the trend.

woman in rockabilty dress poses for the camera
Photo: Darcy Delia

  • It Is Not Only Superficial


Rockabilly is more than just music and fashion; it's a lifestyle. Vintage car culture thrives alongside the music scene, with classic muscle cars and greaser vans adding a nostalgic touch to rockabilly events. Record collecting, too, plays a vital role in the community. 

Hunting for rare vinyl records of rockabilly pioneers allows fans to connect with the genre's roots. And let's not forget the dance! Swing and jitterbug, energetic partner dances rooted in the early days of rock and roll, remain a popular way to express the joy of rockabilly music. For the truly dedicated, rockabilly-themed home decor completes the experience. Think vintage jukeboxes, diner-style furniture, and classic movie posters adorning the walls.

Concluding...


So, are you ready to join the rockabilly revival? This vibrant community welcomes all who share a love for this timeless sound and aesthetic.  Whether you rock a full poodle skirt and cat-eye or add a touch of vintage flair to your everyday wear, rockabilly is all about expressing yourself with confidence and a dash of rebellion.  
  • April 19, 2024

Exploring Rockabilly Style: Fashion, Makeup and Lifestyle Inspiration for Newcomers

collage with rockabilly aesthetic elements for inspiration

Skinny jeans and minimalist makeup are great, of course, but how about diluting your style with some vintage-inspired vibe. The Rockabilly era filled with electrifying sounds, pompadour trends, and a full-fledged lifestyle might become a perfect inspiration for your revived look.  Whether you're a seasoned fashionista or a complete fashion newbie, today's guide is your one-stop shop for rocking this rebellious spirit! 

What is Rockabilly? 


Explaining simply, rockabilly is a genre with blue jeans and hair gel in its DNA. It's a high-octane mix of 1950s country and rhythm and blues, spiced up with matching looks. It's a high-energy mix that combines the twangy guitars and storytelling of country with the driving rhythms and soulful vocals of R&B. Imagine blues melodies given a country makeover, with a dash of that classic rock and roll energy thrown in for good measure. 

collage with rockabilly aesthetic elements for inspiration

  • The Birthplace of a Rockabilly


The 1950s American South was a pot boiling with culture. Rhythm and blues pulsated through juke joints, while country music twanged on rural radios. Young musicians, particularly those growing up in the South, began to weave these seemingly disparate sounds together. This bursting fusion, fueled by a desire for something fresh and exciting, resulted in a sound we call rockabilly. 

The driving rhythm of rock and roll collided with the storytelling spirit of the country, borrowing heavily from blues elements like the electric guitar and call-and-response vocals. Pioneering artists like Carl Perkins, Gene Vincent, and Scotty Moore laid the groundwork for this revolutionary sound, but it was a young truck driver from Mississippi named Elvis Presley who truly ignited the rockabilly flame.

  • Fashion for the Outsiders


Rockabilly wasn't just about the music; it was a visual rebellion. Men donned bold and playful looks. Bowling shirts with their bold patterns and relaxed fit became a staple, while blue jeans and slicked-back greaser hairstyles (think James Dean) conveyed a sense of cool defiance. 

Women embraced the iconic poodle skirt, a playful take on the traditional full skirt, often adorned with bold colors and playful patterns. Bettie Page, a captivating pin-up model, further solidified the rockabilly aesthetic with her signature teased hair, figure-hugging dresses, and rebellious spirit. Putting together an authentic rockabilly look is about more than just clothes; it's about capturing the attitude. Think playful confidence and a touch of vintage flair.

Rockabilly icons: Wanda Jackson, Elvis, Bettie Page

  • Popular Rockabilly Icons, Who Inspired This Style


Elvis Presley wasn't just the "King of Rock and Roll;" first and foremost he was the undisputed king of rockabilly. His electrifying stage presence, smooth vocals, and charisma defined the genre. Yet, rockabilly would never be complete without the contributions of other legends like Johnny Cash and Wanda Jackson, often dubbed the "Queen of Rockabilly".

Bettie Page, though not a musician, became a visual icon for her exceptional rockabilly aesthetic. Her playful sexuality and defiance against societal norms resonated with young women who craved a different kind of femininity.

What Are the Main Rocakbily Features?


Rockabilly isn't just catchy tunes and playful outfits; it's a distinct sound and aesthetic. For a better understanding, let's check out some of the most iconic features of this style.

  • Music:


High Energy: Rockabilly pulsates with a driving beat, often incorporating elements from rock and roll and blues. Think fast tempos, prominent backbeats, and electrifying guitar riffs.

Country Twang: Don't be fooled by the energy; rockabilly retains a strong country influence. Vocal melodies often carry a twang, and lyrics might tell stories of everyday life with a touch of Southern charm.

Boogie Woogie Blues: Piano plays a key role in rockabilly, borrowing heavily from Boogie Woogie with its rolling basslines and playful runs.

  • Fashion:


Men:

Bowling Shirts: These bold, patterned shirts in relaxed fits became a symbol of cool, replacing the formality of traditional dress shirts.

Blue Jeans: Once associated with manual labor, jeans became a badge of individuality for rockabilly men.

Greaser Hairstyles: Slicked-back pompadours with long sideburns were the go-to for a rebellious and youthful look.

Leather Jackets: A touch of bad-boy charm, leather jackets added an edge to rockabilly outfits.

Women:

Poodle Skirts: Playful and full, poodle skirts symbolized a youthful femininity that wasn't afraid to move. Vibrant colors and playful patterns added personality.

Halter Tops: Highlighting the shoulders, halter tops exuded confidence and a touch of vintage glamour.
Cat-Eye Eyeliner: A classic makeup look of the era, cat-eye, and graphic eyeliner added a touch of drama and accentuated the eyes.

Bandannas: Worn as headbands or tied around the neck, bandannas added a touch of rock and roll rebellion to feminine outfits.

Celebrities with rockabilly-inspired hair look: Katty Perry, Scarlett Johansson, Rihanna

  • Hair:


Men: As mentioned previously, greaser hairstyles dominated. But there was variety! Some men opted for a quiff, with hair swept up and forward for a touch of height.

Women: Victory rolls, with hair rolled up at the crown and pinned into place, were a popular choice. For a more relaxed look, pin curls added texture and volume.

  • The Modern Revival of Rockabilly


Rockabilly may have reached its peak in the 1950s, but its spirit never truly faded. Today, contemporary fashion embraces rockabilly elements with a modern twist. Think high-waisted jeans paired with fitted crop tops and vintage-inspired band tees. Celebrities like Katy Perry and Gwen Stefani have been spotted sporting rockabilly-inspired looks, further propelling the trend.

woman in rockabilty dress poses for the camera
Photo: Darcy Delia

  • It Is Not Only Superficial


Rockabilly is more than just music and fashion; it's a lifestyle. Vintage car culture thrives alongside the music scene, with classic muscle cars and greaser vans adding a nostalgic touch to rockabilly events. Record collecting, too, plays a vital role in the community. 

Hunting for rare vinyl records of rockabilly pioneers allows fans to connect with the genre's roots. And let's not forget the dance! Swing and jitterbug, energetic partner dances rooted in the early days of rock and roll, remain a popular way to express the joy of rockabilly music. For the truly dedicated, rockabilly-themed home decor completes the experience. Think vintage jukeboxes, diner-style furniture, and classic movie posters adorning the walls.

Concluding...


So, are you ready to join the rockabilly revival? This vibrant community welcomes all who share a love for this timeless sound and aesthetic.  Whether you rock a full poodle skirt and cat-eye or add a touch of vintage flair to your everyday wear, rockabilly is all about expressing yourself with confidence and a dash of rebellion.  
close-up of an greeen woman's eye with long eyelash extensions

Remember those mornings when mascara application felt like a battlefield struggle? Gone!  For weeks, I lived the dream of effortless, fluttery lashes thanks to a magical invention called eyelash extensions. But then came the heartbreak. Patchy gaps started appearing, and my once-voluminous lashes looked like a sad, deflated spiderweb. Turns out, those luscious extensions require a little TLC and a big mistake, I totally neglected aftercare. 

Here's what I learned (the hard way) about keeping your lash extensions looking flawless for weeks –  consider this your guide to avoiding my mascara-mishap meltdown!

Eyelash Extension Aftercare: Understanding the Essentials


To maintain that flawless look of your newly-acquired eyelashes, proper aftercare is crucial. Here, we delve into the essentials of eyelash extension aftercare, exploring how lifestyle choices impact retention and how to tailor aftercare routines for optimal results.

Heat and humidity are the enemies of long-lasting lashes. Saunas, steam rooms, hot showers, and sweaty workouts can loosen the adhesive that keeps your extensions in place. If you can't avoid these activities entirely, try to limit your exposure. Opt for warm showers instead of hot.

Beauty sleep is crucial for clear, bright eyes, but your sleeping position matters too. Face-sleeping creates friction between your lashes and the pillow, causing breakage and shedding. Train yourself to sleep on your back to minimize contact and keep your extensions looking their best.

Some skincare products you use around your eye can also affect your extensions. Oil-based makeup removers, cleansers, and moisturizers can break down the adhesive bond. Look for oil-free alternatives specifically formulated for eyelash extensions. These will gently cleanse your lashes without compromising their lifespan.

Finally, fight the urge to rub your eyes! This can dislodge your extensions and irritate your natural lashes. If your eyes get itchy, try using artificial tears instead of rubbing. This will soothe your eyes without damaging your lashes.

collage with eyelash extensions care tips

  • Personalized Eyelash Extension Aftercare


A one-size-fits-all approach to aftercare doesn't exist. Here's how to adjust aftercare based on individual lifestyles:

Active Individuals: For those who sweat frequently, cleansing lashes daily with an oil-free lash cleanser is crucial. Invest in a lash brush to gently remove sweat and dirt buildup without rubbing.

Minimalist Makeup Users: If you wear minimal eye makeup, you might only need to cleanse your lashes every other day. However, consistent brushing is still essential to maintain shape and prevent tangles.

Makeup Enthusiasts: For makeup lovers, meticulous cleansing is necessary. Use oil-free makeup removers and cotton swabs (avoiding vigorous rubbing) to remove makeup without compromising your extensions.

Communicate openly with your lash technician about your daily activities. They can tailor specific aftercare instructions to ensure long-lasting extensions.

  • Addressing Allergies and Sensitivities


Some clients might experience allergies or sensitivities to eyelash extensions or the adhesive used. Here's what you can do:

Prioritize Communication: Once again, inform your lash technician before the application process if you have any allergies or sensitivities, especially around the eyes. They can perform a patch test to assess for potential reactions.

Choose Gentle Products: Opt for lash products specifically formulated for sensitive eyes. Look for cleansers that are hypoallergenic and fragrance-free to minimize irritation.

Early Signs: Be mindful of any discomfort or redness that develops after application. If you experience burning, itching, or excessive watering, contact your lash technician immediately. Early detection and communication are key to addressing sensitivities and preventing potential complications.

Investing in High-Quality Lash Products for the Best Durability


When it comes to eyelash extensions, durability isn't just about how long they last on your eyes. High-quality lash products contribute to a longer-lasting experience in two key ways. For instance, lash supply store LASH FLASH ensures that clients invest in extensions that not only look beautiful but also promote lash health.

Premium materials like synthetic fibers or ethically sourced silk are inherently stronger and more resistant to breakage or bending. This translates to extensions that can withstand daily wear and tear without looking sparse or uneven. 

Secondly, top-tier lash adhesives create a stronger bond between the extension and your natural lash. This reduces the risk of premature fallout and ensures your extensions stay put for the entirety of their intended lifespan. 

collage with eyelash extensions care tips

Troubleshooting Common Eyelash Extension Aftercare Challenges


  • #1. Dealing with Lash Fallout


Some lash shedding is natural, even with extensions. However, excessive fallout can be a concern. Here's what you need to know:

Expected Shedding: A few lashes falling out every day is normal. Your natural lashes go through a growth cycle, and extensions attached to shedding lashes will come off too.

Minimizing Fallout: Gently brush your lashes with a spoolie daily to remove loose extensions and prevent them from pulling on healthy lashes. Avoid rubbing your eyes, as this can cause premature detachment.

Seeking Professional Help: If you experience significant fallout within the first few days after application, contact your lash technician. This could indicate improper application or sensitivity.

  • #2. Combatting Build-Up and Residue


The build-up of makeup, oil, and dead skin cells can compromise the adhesive holding your extensions in place. Here's how to keep your lashes clean:

Gentle Cleansing: Invest in a lash cleanser specifically formulated for extensions. Avoid harsh soaps, oils, or makeup removers, as they can break down the adhesive.

Cleansing Technique: Twice daily, gently cleanse your lashes with the cleanser on a spoolie. Use lukewarm water and avoid rubbing; focus on the base of the lash line.

Avoid Excessive Products: Limit mascara use on extensions, as it can contribute to build-up. If you do use mascara, choose oil-free, water-based formulas.

  • #3. The Role of Regular Refills:


Unfortunately, eyelash extensions don't last forever. As your natural lashes grow, the extensions will appear farther from the lash line. Regular refills are crucial for maintaining a full and beautiful look.

Refill Frequency: Generally, refills are recommended every 2-4 weeks, depending on your natural lash growth cycle. Consult your technician to determine the ideal schedule for you.

Benefits of Refills: During a refill appointment, your technician can remove any loose extensions, cleanse your lashes thoroughly, and apply new extensions to maintain a full, even look.

Maintaining Lash Health: Refills allow your technician to monitor your natural lash health and adjust techniques if necessary. This ensures your extensions don't damage your natural lashes in the long run.

Let's summarize...


With these simple eyelash aftercare practices in your beauty arsenal, you can say goodbye to mascara mishaps and hello to weeks of flawless, fluttery lashes. So bat those beauties with confidence, and remember, a little aftercare goes a long way in keeping your extensions looking their absolute best. Now get out there and flaunt those gorgeous eyes!
  • April 11, 2024

Eyelash Extension Aftercare Guide: Keeping Those Lashes Looking Flawless for Weeks!

close-up of an greeen woman's eye with long eyelash extensions

Remember those mornings when mascara application felt like a battlefield struggle? Gone!  For weeks, I lived the dream of effortless, fluttery lashes thanks to a magical invention called eyelash extensions. But then came the heartbreak. Patchy gaps started appearing, and my once-voluminous lashes looked like a sad, deflated spiderweb. Turns out, those luscious extensions require a little TLC and a big mistake, I totally neglected aftercare. 

Here's what I learned (the hard way) about keeping your lash extensions looking flawless for weeks –  consider this your guide to avoiding my mascara-mishap meltdown!

Eyelash Extension Aftercare: Understanding the Essentials


To maintain that flawless look of your newly-acquired eyelashes, proper aftercare is crucial. Here, we delve into the essentials of eyelash extension aftercare, exploring how lifestyle choices impact retention and how to tailor aftercare routines for optimal results.

Heat and humidity are the enemies of long-lasting lashes. Saunas, steam rooms, hot showers, and sweaty workouts can loosen the adhesive that keeps your extensions in place. If you can't avoid these activities entirely, try to limit your exposure. Opt for warm showers instead of hot.

Beauty sleep is crucial for clear, bright eyes, but your sleeping position matters too. Face-sleeping creates friction between your lashes and the pillow, causing breakage and shedding. Train yourself to sleep on your back to minimize contact and keep your extensions looking their best.

Some skincare products you use around your eye can also affect your extensions. Oil-based makeup removers, cleansers, and moisturizers can break down the adhesive bond. Look for oil-free alternatives specifically formulated for eyelash extensions. These will gently cleanse your lashes without compromising their lifespan.

Finally, fight the urge to rub your eyes! This can dislodge your extensions and irritate your natural lashes. If your eyes get itchy, try using artificial tears instead of rubbing. This will soothe your eyes without damaging your lashes.

collage with eyelash extensions care tips

  • Personalized Eyelash Extension Aftercare


A one-size-fits-all approach to aftercare doesn't exist. Here's how to adjust aftercare based on individual lifestyles:

Active Individuals: For those who sweat frequently, cleansing lashes daily with an oil-free lash cleanser is crucial. Invest in a lash brush to gently remove sweat and dirt buildup without rubbing.

Minimalist Makeup Users: If you wear minimal eye makeup, you might only need to cleanse your lashes every other day. However, consistent brushing is still essential to maintain shape and prevent tangles.

Makeup Enthusiasts: For makeup lovers, meticulous cleansing is necessary. Use oil-free makeup removers and cotton swabs (avoiding vigorous rubbing) to remove makeup without compromising your extensions.

Communicate openly with your lash technician about your daily activities. They can tailor specific aftercare instructions to ensure long-lasting extensions.

  • Addressing Allergies and Sensitivities


Some clients might experience allergies or sensitivities to eyelash extensions or the adhesive used. Here's what you can do:

Prioritize Communication: Once again, inform your lash technician before the application process if you have any allergies or sensitivities, especially around the eyes. They can perform a patch test to assess for potential reactions.

Choose Gentle Products: Opt for lash products specifically formulated for sensitive eyes. Look for cleansers that are hypoallergenic and fragrance-free to minimize irritation.

Early Signs: Be mindful of any discomfort or redness that develops after application. If you experience burning, itching, or excessive watering, contact your lash technician immediately. Early detection and communication are key to addressing sensitivities and preventing potential complications.

Investing in High-Quality Lash Products for the Best Durability


When it comes to eyelash extensions, durability isn't just about how long they last on your eyes. High-quality lash products contribute to a longer-lasting experience in two key ways. For instance, lash supply store LASH FLASH ensures that clients invest in extensions that not only look beautiful but also promote lash health.

Premium materials like synthetic fibers or ethically sourced silk are inherently stronger and more resistant to breakage or bending. This translates to extensions that can withstand daily wear and tear without looking sparse or uneven. 

Secondly, top-tier lash adhesives create a stronger bond between the extension and your natural lash. This reduces the risk of premature fallout and ensures your extensions stay put for the entirety of their intended lifespan. 

collage with eyelash extensions care tips

Troubleshooting Common Eyelash Extension Aftercare Challenges


  • #1. Dealing with Lash Fallout


Some lash shedding is natural, even with extensions. However, excessive fallout can be a concern. Here's what you need to know:

Expected Shedding: A few lashes falling out every day is normal. Your natural lashes go through a growth cycle, and extensions attached to shedding lashes will come off too.

Minimizing Fallout: Gently brush your lashes with a spoolie daily to remove loose extensions and prevent them from pulling on healthy lashes. Avoid rubbing your eyes, as this can cause premature detachment.

Seeking Professional Help: If you experience significant fallout within the first few days after application, contact your lash technician. This could indicate improper application or sensitivity.

  • #2. Combatting Build-Up and Residue


The build-up of makeup, oil, and dead skin cells can compromise the adhesive holding your extensions in place. Here's how to keep your lashes clean:

Gentle Cleansing: Invest in a lash cleanser specifically formulated for extensions. Avoid harsh soaps, oils, or makeup removers, as they can break down the adhesive.

Cleansing Technique: Twice daily, gently cleanse your lashes with the cleanser on a spoolie. Use lukewarm water and avoid rubbing; focus on the base of the lash line.

Avoid Excessive Products: Limit mascara use on extensions, as it can contribute to build-up. If you do use mascara, choose oil-free, water-based formulas.

  • #3. The Role of Regular Refills:


Unfortunately, eyelash extensions don't last forever. As your natural lashes grow, the extensions will appear farther from the lash line. Regular refills are crucial for maintaining a full and beautiful look.

Refill Frequency: Generally, refills are recommended every 2-4 weeks, depending on your natural lash growth cycle. Consult your technician to determine the ideal schedule for you.

Benefits of Refills: During a refill appointment, your technician can remove any loose extensions, cleanse your lashes thoroughly, and apply new extensions to maintain a full, even look.

Maintaining Lash Health: Refills allow your technician to monitor your natural lash health and adjust techniques if necessary. This ensures your extensions don't damage your natural lashes in the long run.

Let's summarize...


With these simple eyelash aftercare practices in your beauty arsenal, you can say goodbye to mascara mishaps and hello to weeks of flawless, fluttery lashes. So bat those beauties with confidence, and remember, a little aftercare goes a long way in keeping your extensions looking their absolute best. Now get out there and flaunt those gorgeous eyes!
collage with nature-based aesthetics elements

In our fast-paced everyday routine, the call of nature is stronger than ever. We all crave at least a few moments of peace and tranquility, a chance to escape the digital noise. That's why I propose you all enter nature-based aesthetics – captivating visual trends that draw inspiration from the wonders of the outdoors.

These aesthetics go beyond mere decoration; they're a way of life that promotes mindfulness and appreciation for the environment. Let's delve into ten of these captivating aesthetics, each offering a unique way to reconnect with nature and find your own personal sanctuary.

10 Popular Nature-based Aesthetics to Help You Relax


horizontal collage with cottagecore aesthetic images

  • 1. Cottagecore: 


Imagine a charming cottage nestled amidst rolling hills, overflowing with wildflowers. This is the essence of cottagecore. Think floral prints, pastel colors, wicker furniture, and vintage lace. It evokes a sense of nostalgia for a simpler life, one filled with homegrown vegetables, afternoon tea on flower-patterned tablecloths, and the comforting sounds of nature.

horizontal collage with watercore aesthetic images

  • 2. Watercore: 


Let the calming rhythm of water lull you into a state of relaxation. Watercore embraces the beauty and serenity of all things aquatic. Think ocean waves crashing on the shore, glistening dewdrops on spiderwebs, or the gentle flow of a crystal-clear stream. This aesthetic incorporates cool blues, greens, and teals, with accents of seashells, coral, and flowing fabrics that mimic the movement of water.

horizontal collage with fairycore aesthetic images

  • 3. Fairycore: 


Step into a world of whimsical wonder with fairycore. Imagine a world bathed in soft, ethereal light, populated by iridescent butterflies, delicate flowers, and shimmering crystals. This nature-based aesthetic utilizes pastel colors, with accents of glittery fabrics and natural elements like feathers, moss, and twigs. It evokes a sense of childlike wonder and a belief in the magic that surrounds us.

horizontal collage with mermaidcore aesthetic images

  • 4. Mermaidcore: 


Dive into the captivating world of mermaidcore. This aesthetic celebrates the mystery and beauty of the ocean's depths. Think shimmering scales, seashells, and a color palette dominated by ocean blues, greens, and teals. Mermaidcore aesthetic encourages embracing our inner wildness and tapping into the powerful energy of the ocean.

horizontal collage with witchcore aesthetic images

  • 5. Witchcore: 


Often misunderstood, witchcore isn't about dark magic. It's about celebrating the power of nature and the wisdom of ancient practices. Think earthy tones like deep browns, greens, and purples, adorned with symbols like moons, crystals, herbs, wearable witch outfits, and eclectic accessories. Witchcore encourages a connection with the cycles of nature, self-discovery, and respect for the natural world.

horizontal collage with goblincore aesthetic images

  • 6. Goblincore: 


Embrace the whimsical side of nature with goblincore. This aesthetic draws inspiration from folklore and mythology, featuring elements associated with goblins and the forest floor. Think mossy greens, browns, and earthy textures, with accents of mushrooms, toadstools, and tiny trinkets. Nature-based aesthetic goblincore celebrates the unseen magic and hidden wonders of the natural world.

horizontal collage with earthcore aesthetic images

  • 7. Earthcore: 


Get your hands dirty and reconnect with the very foundation of our planet. Earthcore is a celebration of all things raw and natural. Think browns, deep greens, and earthy textures like wood and stone. This aesthetic encourages a connection with the soil, a respect for sustainability, and an appreciation for the simple beauty of the earth.

horizontal collage with bloomcore aesthetic images

  • 8. Bloomcore: 


Let flowers be your guide to a more vibrant state of mind. Bloomcore is an explosion of color and life, celebrating the joy and beauty of flowers. Think vibrant pinks, yellows, and purples, incorporated through floral prints, fresh flowers, and botanical illustrations. Bloomcore encourages finding beauty in everyday details, embracing optimism, and cultivating a sense of growth.

horizontal collage with green academia aesthetic images

  • 9. Green Academia: 


For those who find solace in intellectual pursuits intertwined with nature, green academia offers a calming aesthetic. Think of libraries bathed in natural light, worn leather-bound books with pressed flowers tucked within, and antique globes. This aesthetic fosters a sense of curiosity and wonder about the natural world, encouraging learning and a connection to the wisdom of past generations.


  • 10. Forestpunk: 


This aesthetic blends the natural world with a touch of rebellion and dystopian edge. Imagine a world reclaimed by nature, with mossy concrete and ferns growing through cracks in the pavement. Forestpunk utilizes a muted color palette with pops of green, featuring natural elements like wood and leather alongside industrial textures like metal and chains. It embodies a call to action to protect the environment and a recognition of the resilience of nature.

Let's Wrap Up...


These are just a few examples of the many nature-based aesthetics available. The beauty lies in finding one that resonates with your personality and allows you to connect with the natural world in a meaningful way. Whether it's creating a cozy cottagecore haven, cultivating a fairy-like garden filled with blooming flowers, or simply taking mindful walks in nature, these aesthetics offer a path to relaxation and a renewed sense of
  • April 05, 2024

10 Nature-based Aesthetics to Help You Relax, Recharge, and Reconnect with Nature

collage with nature-based aesthetics elements

In our fast-paced everyday routine, the call of nature is stronger than ever. We all crave at least a few moments of peace and tranquility, a chance to escape the digital noise. That's why I propose you all enter nature-based aesthetics – captivating visual trends that draw inspiration from the wonders of the outdoors.

These aesthetics go beyond mere decoration; they're a way of life that promotes mindfulness and appreciation for the environment. Let's delve into ten of these captivating aesthetics, each offering a unique way to reconnect with nature and find your own personal sanctuary.

10 Popular Nature-based Aesthetics to Help You Relax


horizontal collage with cottagecore aesthetic images

  • 1. Cottagecore: 


Imagine a charming cottage nestled amidst rolling hills, overflowing with wildflowers. This is the essence of cottagecore. Think floral prints, pastel colors, wicker furniture, and vintage lace. It evokes a sense of nostalgia for a simpler life, one filled with homegrown vegetables, afternoon tea on flower-patterned tablecloths, and the comforting sounds of nature.

horizontal collage with watercore aesthetic images

  • 2. Watercore: 


Let the calming rhythm of water lull you into a state of relaxation. Watercore embraces the beauty and serenity of all things aquatic. Think ocean waves crashing on the shore, glistening dewdrops on spiderwebs, or the gentle flow of a crystal-clear stream. This aesthetic incorporates cool blues, greens, and teals, with accents of seashells, coral, and flowing fabrics that mimic the movement of water.

horizontal collage with fairycore aesthetic images

  • 3. Fairycore: 


Step into a world of whimsical wonder with fairycore. Imagine a world bathed in soft, ethereal light, populated by iridescent butterflies, delicate flowers, and shimmering crystals. This nature-based aesthetic utilizes pastel colors, with accents of glittery fabrics and natural elements like feathers, moss, and twigs. It evokes a sense of childlike wonder and a belief in the magic that surrounds us.

horizontal collage with mermaidcore aesthetic images

  • 4. Mermaidcore: 


Dive into the captivating world of mermaidcore. This aesthetic celebrates the mystery and beauty of the ocean's depths. Think shimmering scales, seashells, and a color palette dominated by ocean blues, greens, and teals. Mermaidcore aesthetic encourages embracing our inner wildness and tapping into the powerful energy of the ocean.

horizontal collage with witchcore aesthetic images

  • 5. Witchcore: 


Often misunderstood, witchcore isn't about dark magic. It's about celebrating the power of nature and the wisdom of ancient practices. Think earthy tones like deep browns, greens, and purples, adorned with symbols like moons, crystals, herbs, wearable witch outfits, and eclectic accessories. Witchcore encourages a connection with the cycles of nature, self-discovery, and respect for the natural world.

horizontal collage with goblincore aesthetic images

  • 6. Goblincore: 


Embrace the whimsical side of nature with goblincore. This aesthetic draws inspiration from folklore and mythology, featuring elements associated with goblins and the forest floor. Think mossy greens, browns, and earthy textures, with accents of mushrooms, toadstools, and tiny trinkets. Nature-based aesthetic goblincore celebrates the unseen magic and hidden wonders of the natural world.

horizontal collage with earthcore aesthetic images

  • 7. Earthcore: 


Get your hands dirty and reconnect with the very foundation of our planet. Earthcore is a celebration of all things raw and natural. Think browns, deep greens, and earthy textures like wood and stone. This aesthetic encourages a connection with the soil, a respect for sustainability, and an appreciation for the simple beauty of the earth.

horizontal collage with bloomcore aesthetic images

  • 8. Bloomcore: 


Let flowers be your guide to a more vibrant state of mind. Bloomcore is an explosion of color and life, celebrating the joy and beauty of flowers. Think vibrant pinks, yellows, and purples, incorporated through floral prints, fresh flowers, and botanical illustrations. Bloomcore encourages finding beauty in everyday details, embracing optimism, and cultivating a sense of growth.

horizontal collage with green academia aesthetic images

  • 9. Green Academia: 


For those who find solace in intellectual pursuits intertwined with nature, green academia offers a calming aesthetic. Think of libraries bathed in natural light, worn leather-bound books with pressed flowers tucked within, and antique globes. This aesthetic fosters a sense of curiosity and wonder about the natural world, encouraging learning and a connection to the wisdom of past generations.


  • 10. Forestpunk: 


This aesthetic blends the natural world with a touch of rebellion and dystopian edge. Imagine a world reclaimed by nature, with mossy concrete and ferns growing through cracks in the pavement. Forestpunk utilizes a muted color palette with pops of green, featuring natural elements like wood and leather alongside industrial textures like metal and chains. It embodies a call to action to protect the environment and a recognition of the resilience of nature.

Let's Wrap Up...


These are just a few examples of the many nature-based aesthetics available. The beauty lies in finding one that resonates with your personality and allows you to connect with the natural world in a meaningful way. Whether it's creating a cozy cottagecore haven, cultivating a fairy-like garden filled with blooming flowers, or simply taking mindful walks in nature, these aesthetics offer a path to relaxation and a renewed sense of
woman with a bright blue hair wig
Photo: Luis Quintero

Ever flipped through a magazine and wished you could rock that effortlessly chic lob or flirty pixie cut?  Well, with wigs taking the world by storm, those dream hairstyles are closer than ever! But before you dive headfirst into wig wonderland, let's unlock the secret to finding the perfect match for your face shape. This guide will be your compass, navigating you toward a wig that makes you feel confident and undeniably fabulous.

Where to Start Your Search for a Perfect Wig?


To navigate this selection process effectively, it's essential to first accurately identify your face shape. Whether it's oval, round, square, heart, or diamond, each shape has its unique characteristics and corresponding wig styles that can enhance your natural beauty.  For example, someone with an oval face might look best in wigs that have layers and texture, which can add dimension and balance to their naturally balanced features. 

Conversely, individuals with round faces may opt for longer, straight wigs that help elongate their facial appearance, creating an illusion of slenderness. This level of customization ensures that the wig not only suits your personal taste but also complements your face shape in the most flattering way possible.

  • Consider Your Skintone and Personal Style


Moreover, beyond face shape, other factors come into play when selecting the perfect wig. Considerations such as the wig’s color, length, and texture can also significantly impact how well it complements your overall look. For instance, the right color can enhance your skin tone, while the appropriate length can highlight your best facial features. Similarly, the texture of the wig can either add volume to thin faces or soften the angles of a more angular face. 

By taking a holistic approach to wig selection, you can ensure that your choice not only boosts your confidence but also feels like a natural extension of your personal style. This comprehensive method of selection underscores the importance of understanding not just what you like, but what works best for your unique features and aesthetic preferences. 

For those interested in exploring options that might illuminate their look with a radiant hue, consider the collection of virgin hair wigs that seamlessly blend with various skin tones, offering a warm and inviting appearance.

woman with a natural-looking human hair wig and short bob cut
Photo: @Truegloryhair.com

Understanding Your Face Shape is Crucial


The journey to finding the perfect wig also involves experimenting with various styles and textures to see what truly complements your natural aesthetics. This exploration is not just about aligning with current fashion trends but discovering a style that resonates with your personal identity and lifestyle. 

Whether you prefer a sleek, straight look or voluminous curls, the key is to find a wig that feels right for you. It's also worth considering how the wig will fit into your daily activities. For example, a more durable and easy-to-maintain wig might be preferable if you lead an active lifestyle. On the other hand, you might opt for a more luxurious and delicate wig for special occasions.

Additionally, the material of the wig plays a crucial role in its appearance and how it interacts with your skin. Synthetic wigs offer the convenience of minimal maintenance, while human hair wigs provide a more natural look and feel, allowing for greater styling flexibility. Both options have their unique advantages, and your choice will depend on your personal needs, budget, and the amount of time you are willing to dedicate to wig care. 

By taking these factors into consideration, you ensure that your wig not only boosts your visual appeal but also fits comfortably into your life, enhancing your overall confidence and allowing your true self to be seen and appreciated.

How to Identify Your Face Shape?


One of the first steps that you need to take before choosing your wig is to understand and identify your face shape. Each face shape has its distinct characteristics, and recognizing these can guide you in making choices that enhance your best features. Following the initial guide, here’s a more detailed look at each face shape and its attributes:

Below, we provide practical guidance on how to accurately determine your face shape, laying the foundation for personalized style choices that highlight your natural beauty.

  • Oval: Known for its balanced proportions, the oval face shape allows for a wide range of wig styles. The aim is to maintain this natural balance, so almost any wig style works well, from bobs to long layers. Try to stay away from wigs that have heavy bangs or volume on top, as these can elongate the face further.

  • Round: The goal of a round face is to create the illusion of length, making the face appear more oval. High-volume wigs on top or long, straight styles that skim the cheeks work best. Layers that add structure or angular cuts can also be flattering, helping to define the face more distinctly.

  • Square: Square faces benefit from wigs that soften the jawline and forehead. Styles that add roundness and volume at the crown or have curls and waves starting from the cheeks downwards can minimize the square appearance. Side-parted styles or layers can also help to soften the face’s angular nature.

  • Heart: For heart-shaped faces, the objective is to balance the wider forehead with the narrower chin. Wigs with volume around the jaw and neck can achieve this balance, as can layers that frame the face. Side-swept bangs or bobs that level with the chin are particularly flattering.

  • Diamond: The diamond face shape, with its wide cheekbones and narrow chin and forehead, looks best in wigs that add width to the forehead and chin. Bob cuts, fringe bangs, or styles that are fuller at the jawline can help balance the face shape. Avoiding excessive volume at the sides can prevent making the cheekbones appear wider.

woman with a natural-looking human hair wig and short bob cut

5 Golden Rules for the Best Wig Selection


Now that we've established the importance of personal style, complexion, and face shape in wig selection, let's unlock the final key rules for finding your perfect wig! Whether you crave a touch of Hollywood glamour, a mysterious dark aesthetic, or a simple hair color refresh, choosing the right wig is crucial – it can elevate your entire look. But with a vast array of styles and textures available, it's easy to feel overwhelmed. To help navigate this exciting world, here are a few golden rules to keep in mind when shopping for your next hair masterpiece.

  • #1. Consider Your Face Shape

As we discussed previously, finding the right wig is just like finding a good haircut, and wig selection benefits from considering your face shape. 

Oval Face Shape: Virtually any style flatters an oval face. Feel free to experiment with different lengths, textures, and cuts.

Round Face Shape: Opt for styles that elongate your face, such as long layers or angular cuts, as short and blunt bangs can emphasize the face's roundness.

Square Face Shape: Look for wigs with soft layers or curls to soften the jawline. Medium-length styles that add volume at the top can also be flattering.

Heart Face Shape: Choose wigs that balance the width of the forehead with the narrowness of the chin. Layers near the jawline or wigs with bangs can achieve this balance.

Diamond Face Shape: Select styles that add width at the forehead and chin, such as bob cuts or layered waves, to soften the cheekbones' prominence.

  • #2. Match Your Hair Color (or Not!)

You can absolutely go for a wig that matches your natural hair color, but don't be afraid to experiment! Wigs offer a chance to embrace a whole new look. Consider your skin tone when choosing a color; cooler tones work well with ash blondes or auburn, while warmer tones can rock golden blondes or rich browns.

  • #3. Embrace the Right Fit

 A wig that fits well is key for both comfort and realism. Most wigs come in adjustable sizes, but if you're unsure, opt for a slightly larger size that can be tailored down. A snug fit might seem secure at first, but it can lead to headaches and discomfort later.

  • #4. Fiber Type Matters

Wigs come in synthetic and human hair options. Synthetic wigs are generally more affordable and require less maintenance, but may not have the same natural look and feel of human hair. Human hair wigs offer the most realistic look and feel, but require more care and styling, similar to your natural hair.

  • #5. Confidence is Key

The most important rule? Choose a wig that makes you feel fabulous! With so many options available, there's a perfect wig out there waiting to boost your confidence and turn heads.

collage with two images: woman takes care of her wig

Maintenance and Care Tips for Your Wig


Whether you're a seasoned wig wearer or a curious newcomer, keeping your wig looking its best is key to maximizing its lifespan and rocking your desired style with confidence. From gentle cleansing routines to proper storage solutions, this guide unveils the secrets to maintaining your wig's vibrancy, softness, and realistic look.

  • Avoid Heat Damage: Keep your wig away from high-heat sources. If you have a synthetic wig, it's especially important to avoid heat-styling tools. For human hair wigs, use heat protection products and keep styling tools at a low temperature to prevent damage.

  • Use the Right Products: Invest in wig-specific shampoos, conditioners, and styling products. These are formulated to be gentle on the fibers and ensure the longevity of your wig. Regular hair care products might contain ingredients that can deteriorate the wig's quality over time.

  • Detangling: Before washing, gently detangle your wig with a wide-tooth comb or a wig brush. Begin wig detangling from the very ends and slowly work your way up. This detangling technique avoids breaking hair fibers. For stubborn tangles, applying a detangling spray can help ease the process.

  • Drying: After washing, pat your wig gently with a towel to remove excess water. Avoid wringing or twisting the cap and hair. Let it air dry on a special wig stand, and make sure that sunrays don't reach your wig. For synthetic wigs, avoid using a blow dryer unless it's set in a cool setting.

  • Refreshing Style: If your wig starts to look tired or flat, using a wig steamer can rejuvenate the fibers and bring back volume and style. This is particularly useful for synthetic wigs to help maintain their shape and texture.

  • Professional Care: Occasionally, take your wig to a professional stylist who specializes in wigs. They can provide deep cleaning, conditioning, and styling services that can extend the life of your wig and keep it looking its best.

By adhering to these care tips, you can ensure that your wig remains beautiful and vibrant, mirroring the natural hair's look and feel as closely as possible.

Let's summarize...


When selecting a wig, consider the texture and color that best suits your complexion and natural hair color. This alignment ensures a seamless transition and a more authentic look. For instance, if you have a cooler skin tone, wigs in shades like platinum blonde, ash brown, or jet black can enhance your natural beauty. Conversely, warmer skin tones may be complemented by honey blonde, rich browns, or auburn shades. Remember, the goal is to find a wig that feels like a part of you, so take your time to explore different hues and textures.
  • April 01, 2024

Golden Wigs: How to Choose the Perfect Wig for Your Face Shape

woman with a bright blue hair wig
Photo: Luis Quintero

Ever flipped through a magazine and wished you could rock that effortlessly chic lob or flirty pixie cut?  Well, with wigs taking the world by storm, those dream hairstyles are closer than ever! But before you dive headfirst into wig wonderland, let's unlock the secret to finding the perfect match for your face shape. This guide will be your compass, navigating you toward a wig that makes you feel confident and undeniably fabulous.

Where to Start Your Search for a Perfect Wig?


To navigate this selection process effectively, it's essential to first accurately identify your face shape. Whether it's oval, round, square, heart, or diamond, each shape has its unique characteristics and corresponding wig styles that can enhance your natural beauty.  For example, someone with an oval face might look best in wigs that have layers and texture, which can add dimension and balance to their naturally balanced features. 

Conversely, individuals with round faces may opt for longer, straight wigs that help elongate their facial appearance, creating an illusion of slenderness. This level of customization ensures that the wig not only suits your personal taste but also complements your face shape in the most flattering way possible.

  • Consider Your Skintone and Personal Style


Moreover, beyond face shape, other factors come into play when selecting the perfect wig. Considerations such as the wig’s color, length, and texture can also significantly impact how well it complements your overall look. For instance, the right color can enhance your skin tone, while the appropriate length can highlight your best facial features. Similarly, the texture of the wig can either add volume to thin faces or soften the angles of a more angular face. 

By taking a holistic approach to wig selection, you can ensure that your choice not only boosts your confidence but also feels like a natural extension of your personal style. This comprehensive method of selection underscores the importance of understanding not just what you like, but what works best for your unique features and aesthetic preferences. 

For those interested in exploring options that might illuminate their look with a radiant hue, consider the collection of virgin hair wigs that seamlessly blend with various skin tones, offering a warm and inviting appearance.

woman with a natural-looking human hair wig and short bob cut
Photo: @Truegloryhair.com

Understanding Your Face Shape is Crucial


The journey to finding the perfect wig also involves experimenting with various styles and textures to see what truly complements your natural aesthetics. This exploration is not just about aligning with current fashion trends but discovering a style that resonates with your personal identity and lifestyle. 

Whether you prefer a sleek, straight look or voluminous curls, the key is to find a wig that feels right for you. It's also worth considering how the wig will fit into your daily activities. For example, a more durable and easy-to-maintain wig might be preferable if you lead an active lifestyle. On the other hand, you might opt for a more luxurious and delicate wig for special occasions.

Additionally, the material of the wig plays a crucial role in its appearance and how it interacts with your skin. Synthetic wigs offer the convenience of minimal maintenance, while human hair wigs provide a more natural look and feel, allowing for greater styling flexibility. Both options have their unique advantages, and your choice will depend on your personal needs, budget, and the amount of time you are willing to dedicate to wig care. 

By taking these factors into consideration, you ensure that your wig not only boosts your visual appeal but also fits comfortably into your life, enhancing your overall confidence and allowing your true self to be seen and appreciated.

How to Identify Your Face Shape?


One of the first steps that you need to take before choosing your wig is to understand and identify your face shape. Each face shape has its distinct characteristics, and recognizing these can guide you in making choices that enhance your best features. Following the initial guide, here’s a more detailed look at each face shape and its attributes:

Below, we provide practical guidance on how to accurately determine your face shape, laying the foundation for personalized style choices that highlight your natural beauty.

  • Oval: Known for its balanced proportions, the oval face shape allows for a wide range of wig styles. The aim is to maintain this natural balance, so almost any wig style works well, from bobs to long layers. Try to stay away from wigs that have heavy bangs or volume on top, as these can elongate the face further.

  • Round: The goal of a round face is to create the illusion of length, making the face appear more oval. High-volume wigs on top or long, straight styles that skim the cheeks work best. Layers that add structure or angular cuts can also be flattering, helping to define the face more distinctly.

  • Square: Square faces benefit from wigs that soften the jawline and forehead. Styles that add roundness and volume at the crown or have curls and waves starting from the cheeks downwards can minimize the square appearance. Side-parted styles or layers can also help to soften the face’s angular nature.

  • Heart: For heart-shaped faces, the objective is to balance the wider forehead with the narrower chin. Wigs with volume around the jaw and neck can achieve this balance, as can layers that frame the face. Side-swept bangs or bobs that level with the chin are particularly flattering.

  • Diamond: The diamond face shape, with its wide cheekbones and narrow chin and forehead, looks best in wigs that add width to the forehead and chin. Bob cuts, fringe bangs, or styles that are fuller at the jawline can help balance the face shape. Avoiding excessive volume at the sides can prevent making the cheekbones appear wider.

woman with a natural-looking human hair wig and short bob cut

5 Golden Rules for the Best Wig Selection


Now that we've established the importance of personal style, complexion, and face shape in wig selection, let's unlock the final key rules for finding your perfect wig! Whether you crave a touch of Hollywood glamour, a mysterious dark aesthetic, or a simple hair color refresh, choosing the right wig is crucial – it can elevate your entire look. But with a vast array of styles and textures available, it's easy to feel overwhelmed. To help navigate this exciting world, here are a few golden rules to keep in mind when shopping for your next hair masterpiece.

  • #1. Consider Your Face Shape

As we discussed previously, finding the right wig is just like finding a good haircut, and wig selection benefits from considering your face shape. 

Oval Face Shape: Virtually any style flatters an oval face. Feel free to experiment with different lengths, textures, and cuts.

Round Face Shape: Opt for styles that elongate your face, such as long layers or angular cuts, as short and blunt bangs can emphasize the face's roundness.

Square Face Shape: Look for wigs with soft layers or curls to soften the jawline. Medium-length styles that add volume at the top can also be flattering.

Heart Face Shape: Choose wigs that balance the width of the forehead with the narrowness of the chin. Layers near the jawline or wigs with bangs can achieve this balance.

Diamond Face Shape: Select styles that add width at the forehead and chin, such as bob cuts or layered waves, to soften the cheekbones' prominence.

  • #2. Match Your Hair Color (or Not!)

You can absolutely go for a wig that matches your natural hair color, but don't be afraid to experiment! Wigs offer a chance to embrace a whole new look. Consider your skin tone when choosing a color; cooler tones work well with ash blondes or auburn, while warmer tones can rock golden blondes or rich browns.

  • #3. Embrace the Right Fit

 A wig that fits well is key for both comfort and realism. Most wigs come in adjustable sizes, but if you're unsure, opt for a slightly larger size that can be tailored down. A snug fit might seem secure at first, but it can lead to headaches and discomfort later.

  • #4. Fiber Type Matters

Wigs come in synthetic and human hair options. Synthetic wigs are generally more affordable and require less maintenance, but may not have the same natural look and feel of human hair. Human hair wigs offer the most realistic look and feel, but require more care and styling, similar to your natural hair.

  • #5. Confidence is Key

The most important rule? Choose a wig that makes you feel fabulous! With so many options available, there's a perfect wig out there waiting to boost your confidence and turn heads.

collage with two images: woman takes care of her wig

Maintenance and Care Tips for Your Wig


Whether you're a seasoned wig wearer or a curious newcomer, keeping your wig looking its best is key to maximizing its lifespan and rocking your desired style with confidence. From gentle cleansing routines to proper storage solutions, this guide unveils the secrets to maintaining your wig's vibrancy, softness, and realistic look.

  • Avoid Heat Damage: Keep your wig away from high-heat sources. If you have a synthetic wig, it's especially important to avoid heat-styling tools. For human hair wigs, use heat protection products and keep styling tools at a low temperature to prevent damage.

  • Use the Right Products: Invest in wig-specific shampoos, conditioners, and styling products. These are formulated to be gentle on the fibers and ensure the longevity of your wig. Regular hair care products might contain ingredients that can deteriorate the wig's quality over time.

  • Detangling: Before washing, gently detangle your wig with a wide-tooth comb or a wig brush. Begin wig detangling from the very ends and slowly work your way up. This detangling technique avoids breaking hair fibers. For stubborn tangles, applying a detangling spray can help ease the process.

  • Drying: After washing, pat your wig gently with a towel to remove excess water. Avoid wringing or twisting the cap and hair. Let it air dry on a special wig stand, and make sure that sunrays don't reach your wig. For synthetic wigs, avoid using a blow dryer unless it's set in a cool setting.

  • Refreshing Style: If your wig starts to look tired or flat, using a wig steamer can rejuvenate the fibers and bring back volume and style. This is particularly useful for synthetic wigs to help maintain their shape and texture.

  • Professional Care: Occasionally, take your wig to a professional stylist who specializes in wigs. They can provide deep cleaning, conditioning, and styling services that can extend the life of your wig and keep it looking its best.

By adhering to these care tips, you can ensure that your wig remains beautiful and vibrant, mirroring the natural hair's look and feel as closely as possible.

Let's summarize...


When selecting a wig, consider the texture and color that best suits your complexion and natural hair color. This alignment ensures a seamless transition and a more authentic look. For instance, if you have a cooler skin tone, wigs in shades like platinum blonde, ash brown, or jet black can enhance your natural beauty. Conversely, warmer skin tones may be complemented by honey blonde, rich browns, or auburn shades. Remember, the goal is to find a wig that feels like a part of you, so take your time to explore different hues and textures.