woman in a beauty salon doing skincare
Photo: Kerim Eveyik

Dusky complexions yearning for a radiant glow? Tired of battling clogged pores and stubborn fine lines? Hydrofacial therapy has emerged as an innovative treatment option for everyone, who is seeking to rejuvenate and revitalize the skin. Additionally, it promises deep cleansing, intense hydration, and a radiant complexion – all in one go. Get ready to quench your skin's thirst and unveil a smoother, brighter you!

Understanding Hydrofacial Therapy


Hydrofacial therapy is a non-invasive skincare treatment designed to address a variety of skin concerns, including dullness, congestion, fine lines, and dehydration. Unlike traditional facials, which may rely on manual extraction or harsh exfoliants, hydrofacial therapy utilizes a patented technology to deliver a gentle yet effective treatment. By combining multiple steps into a single session, hydrofacial therapy offers comprehensive skincare benefits with minimal discomfort and downtime.

How is it Carried Out?


And what happens during this treatment? Let's take a close look at the multi-step process behind this popular skincare technique.

  • 1. Consultation and Customization:

Your journey begins with a consultation with a licensed aesthetician. They'll assess your skin type, concerns (dryness, wrinkles, acne), and desired outcomes. This personalized approach ensures the treatment targets your specific needs.  Based on this discussion, the aesthetician will select a customized blend of serums to be delivered throughout the treatment. These serums might contain hyaluronic acid for intense hydration, salicylic acid for unclogging pores, or antioxidants for fighting free radical damage.

  • 2. Cleansing and Exfoliation:

The first step of the Hydrofacial treatment focuses on removing dirt, oil, and dead skin cells.  A specially designed handpiece equipped with a gentle tip glides across your face.  This tip uses a vortex technology that combines painless suction with cleansing solutions to remove impurities without irritating the skin.

  • 3. Gentle Extractions:

Next comes the extraction phase, which often raises concerns about discomfort. However, the Hydrofacial approach is far more gentle than traditional extractions. The vortex technology softens blackheads and whiteheads, allowing the aesthetician to easily remove them using the handpiece's suction. This minimizes the risk of inflammation and scarring often associated with manual extractions.

  • 4. Hydration and Nourishment:

Now that your skin is cleansed and prepped, it can receive a nourishing boost. The Hydrofacial handpiece is used again, but this time, it delivers the customized serum blend chosen during the consultation. These serums penetrate deeply into the freshly exfoliated skin, providing intense hydration, addressing specific concerns, and promoting healthy, glowing skin.

  • 5. LED Light Therapy (Optional):

Many Hydrafacial machines offer an additional step – LED light therapy.  The aesthetician will place a special light panel near your face, emitting specific wavelengths.  These lights have various benefits depending on the color used.  Red light therapy can stimulate collagen production, promoting a firmer, younger-looking appearance.  Blue light can help target acne-causing bacteria. The aesthetician will choose the appropriate light based on your needs.

  • 6. Protection and Post-Treatment Care:

The final step involves applying a moisturizer with SPF to protect your newly refreshed skin. The aesthetician will also provide personalized post-treatment care instructions, which may include avoiding harsh products and sun exposure for a few days.

woman in a beauty salon doing skincare
Photo: John Tekeridis

Types of Hydrofacial Treatments


While the core benefits of cleansing, exfoliation, extraction, and hydration remain constant, HydraFacial offers a range of options to address specific skin concerns. Here's a peek at the most popular types:

Classic HydraFacial: This is the perfect starting point, ideal for all skin types. It delivers a thorough cleansing, removes impurities, and infuses the skin with hydrating serums, leaving you with a refreshed and revitalized complexion.

Deluxe HydraFacial: Taking things a step further, the Deluxe version incorporates a booster treatment. These targeted serums address specific concerns like hyperpigmentation, fine lines, or enlarged pores, providing a customized approach for a more dramatic result.

Brit + Glow HydraFacial: For those seeking a lit-from-within radiance, the Brit + Glow incorporates a brightening booster and a vitamin C infusion. This powerhouse combo tackles dullness and uneven skin tone, revealing a healthy, youthful glow.

What are the Main Effects of Hydrofacial Therapy on the Skin


Hydrofacial therapy's effectiveness lies in its multi-pronged approach. The benefits extend far beyond a momentary post-treatment gleam. Here's how hydrofacial therapy can work wonders on your skin:

  • Unveiling Brighter, More Even Skin Tone: Sun damage, acne scars, and hyperpigmentation can leave your complexion looking dull and uneven. Hydrofacial therapy's gentle yet effective exfoliation helps clear away these imperfections, revealing a brighter, more even skin tone.

  • Kiss Large Pores Goodbye: Clogged pores are a breeding ground for blemishes and blackheads. Hydrofacial therapy uses a gentle suction technique to extract impurities from deep within your pores, minimizing their appearance and preventing future breakouts.

  • Hydration Hero: Dehydrated skin can look dull and flaky. Hydrofacial therapy infuses your skin with hyaluronic acid, a powerful humectant that attracts and retains moisture. This leaves your skin feeling plump, supple, and radiant.

  • Fine Lines and Wrinkles? Not Today: As we age, our skin loses collagen, leading to the formation of fine lines and wrinkles. Hydrofacial therapy stimulates collagen production and promotes cell turnover, resulting in a firmer, more youthful appearance.

  • Tailored for Your Unique Skin: Unlike one-size-fits-all facials, hydrofacial treatments can be customized to address your specific skin concerns. Whether you struggle with acne, dryness, or signs of aging, your aesthetician can select serums and boosters to target your needs.

  • Gentle Yet Effective:  Hydrofacial therapy offers a more gentle alternative to traditional facials that can be harsh on sensitive skin. The treatment is generally well-tolerated, with minimal downtime, making it ideal for busy individuals who want to maintain a healthy glow without sacrificing precious time.

Let's summarize...


Why not revitalize your skin and experience the transformative power of hydrafacial therapy for yourself? Treat yourself to a consultation to discuss your unique needs and discover if a hydrafacial is the perfect path to a refreshed, radiant you. Let your skin breathe a sigh of relief and embark on a journey towards a healthier, more confident glow.
  • May 14, 2024

Hydrofacial Therapy: A Refreshing Approach to Skincare

woman in a beauty salon doing skincare
Photo: Kerim Eveyik

Dusky complexions yearning for a radiant glow? Tired of battling clogged pores and stubborn fine lines? Hydrofacial therapy has emerged as an innovative treatment option for everyone, who is seeking to rejuvenate and revitalize the skin. Additionally, it promises deep cleansing, intense hydration, and a radiant complexion – all in one go. Get ready to quench your skin's thirst and unveil a smoother, brighter you!

Understanding Hydrofacial Therapy


Hydrofacial therapy is a non-invasive skincare treatment designed to address a variety of skin concerns, including dullness, congestion, fine lines, and dehydration. Unlike traditional facials, which may rely on manual extraction or harsh exfoliants, hydrofacial therapy utilizes a patented technology to deliver a gentle yet effective treatment. By combining multiple steps into a single session, hydrofacial therapy offers comprehensive skincare benefits with minimal discomfort and downtime.

How is it Carried Out?


And what happens during this treatment? Let's take a close look at the multi-step process behind this popular skincare technique.

  • 1. Consultation and Customization:

Your journey begins with a consultation with a licensed aesthetician. They'll assess your skin type, concerns (dryness, wrinkles, acne), and desired outcomes. This personalized approach ensures the treatment targets your specific needs.  Based on this discussion, the aesthetician will select a customized blend of serums to be delivered throughout the treatment. These serums might contain hyaluronic acid for intense hydration, salicylic acid for unclogging pores, or antioxidants for fighting free radical damage.

  • 2. Cleansing and Exfoliation:

The first step of the Hydrofacial treatment focuses on removing dirt, oil, and dead skin cells.  A specially designed handpiece equipped with a gentle tip glides across your face.  This tip uses a vortex technology that combines painless suction with cleansing solutions to remove impurities without irritating the skin.

  • 3. Gentle Extractions:

Next comes the extraction phase, which often raises concerns about discomfort. However, the Hydrofacial approach is far more gentle than traditional extractions. The vortex technology softens blackheads and whiteheads, allowing the aesthetician to easily remove them using the handpiece's suction. This minimizes the risk of inflammation and scarring often associated with manual extractions.

  • 4. Hydration and Nourishment:

Now that your skin is cleansed and prepped, it can receive a nourishing boost. The Hydrofacial handpiece is used again, but this time, it delivers the customized serum blend chosen during the consultation. These serums penetrate deeply into the freshly exfoliated skin, providing intense hydration, addressing specific concerns, and promoting healthy, glowing skin.

  • 5. LED Light Therapy (Optional):

Many Hydrafacial machines offer an additional step – LED light therapy.  The aesthetician will place a special light panel near your face, emitting specific wavelengths.  These lights have various benefits depending on the color used.  Red light therapy can stimulate collagen production, promoting a firmer, younger-looking appearance.  Blue light can help target acne-causing bacteria. The aesthetician will choose the appropriate light based on your needs.

  • 6. Protection and Post-Treatment Care:

The final step involves applying a moisturizer with SPF to protect your newly refreshed skin. The aesthetician will also provide personalized post-treatment care instructions, which may include avoiding harsh products and sun exposure for a few days.

woman in a beauty salon doing skincare
Photo: John Tekeridis

Types of Hydrofacial Treatments


While the core benefits of cleansing, exfoliation, extraction, and hydration remain constant, HydraFacial offers a range of options to address specific skin concerns. Here's a peek at the most popular types:

Classic HydraFacial: This is the perfect starting point, ideal for all skin types. It delivers a thorough cleansing, removes impurities, and infuses the skin with hydrating serums, leaving you with a refreshed and revitalized complexion.

Deluxe HydraFacial: Taking things a step further, the Deluxe version incorporates a booster treatment. These targeted serums address specific concerns like hyperpigmentation, fine lines, or enlarged pores, providing a customized approach for a more dramatic result.

Brit + Glow HydraFacial: For those seeking a lit-from-within radiance, the Brit + Glow incorporates a brightening booster and a vitamin C infusion. This powerhouse combo tackles dullness and uneven skin tone, revealing a healthy, youthful glow.

What are the Main Effects of Hydrofacial Therapy on the Skin


Hydrofacial therapy's effectiveness lies in its multi-pronged approach. The benefits extend far beyond a momentary post-treatment gleam. Here's how hydrofacial therapy can work wonders on your skin:

  • Unveiling Brighter, More Even Skin Tone: Sun damage, acne scars, and hyperpigmentation can leave your complexion looking dull and uneven. Hydrofacial therapy's gentle yet effective exfoliation helps clear away these imperfections, revealing a brighter, more even skin tone.

  • Kiss Large Pores Goodbye: Clogged pores are a breeding ground for blemishes and blackheads. Hydrofacial therapy uses a gentle suction technique to extract impurities from deep within your pores, minimizing their appearance and preventing future breakouts.

  • Hydration Hero: Dehydrated skin can look dull and flaky. Hydrofacial therapy infuses your skin with hyaluronic acid, a powerful humectant that attracts and retains moisture. This leaves your skin feeling plump, supple, and radiant.

  • Fine Lines and Wrinkles? Not Today: As we age, our skin loses collagen, leading to the formation of fine lines and wrinkles. Hydrofacial therapy stimulates collagen production and promotes cell turnover, resulting in a firmer, more youthful appearance.

  • Tailored for Your Unique Skin: Unlike one-size-fits-all facials, hydrofacial treatments can be customized to address your specific skin concerns. Whether you struggle with acne, dryness, or signs of aging, your aesthetician can select serums and boosters to target your needs.

  • Gentle Yet Effective:  Hydrofacial therapy offers a more gentle alternative to traditional facials that can be harsh on sensitive skin. The treatment is generally well-tolerated, with minimal downtime, making it ideal for busy individuals who want to maintain a healthy glow without sacrificing precious time.

Let's summarize...


Why not revitalize your skin and experience the transformative power of hydrafacial therapy for yourself? Treat yourself to a consultation to discuss your unique needs and discover if a hydrafacial is the perfect path to a refreshed, radiant you. Let your skin breathe a sigh of relief and embark on a journey towards a healthier, more confident glow.
collage with three women wearing harajuku street style outfits

Harajuku, the vibrant neighborhood in Tokyo, Japan, has long been a melting pot of creativity, eccentricity, and innovation, particularly in the realm of fashion. Renowned worldwide for its avant-garde styles, Harajuku fashion has become a global phenomenon, influencing designers, artists, and fashion enthusiasts alike. In this article, we'll delve into the kaleidoscopic world of Harajuku fashion and uncover five must-see styles that encapsulate its alt spirit.

A Brief Look at Harajuku


Harajuku's journey from a pedestrian street to a global fashion icon is a vibrant story. Once a quiet neighborhood in Tokyo, it blossomed in the post-war era as a haven for youthful self-expression. Teenagers, fueled by newfound prosperity and a desire to break free from conformity, embraced unique, often outlandish styles. This explosion of creativity, fueled by thrift stores and vintage finds, became the "Harajuku phenomenon" – a movement that challenged fashion norms and continues to inspire the world.

Top 5 Must-See Harajuku Fashion Styles That Will Blow Your Mind

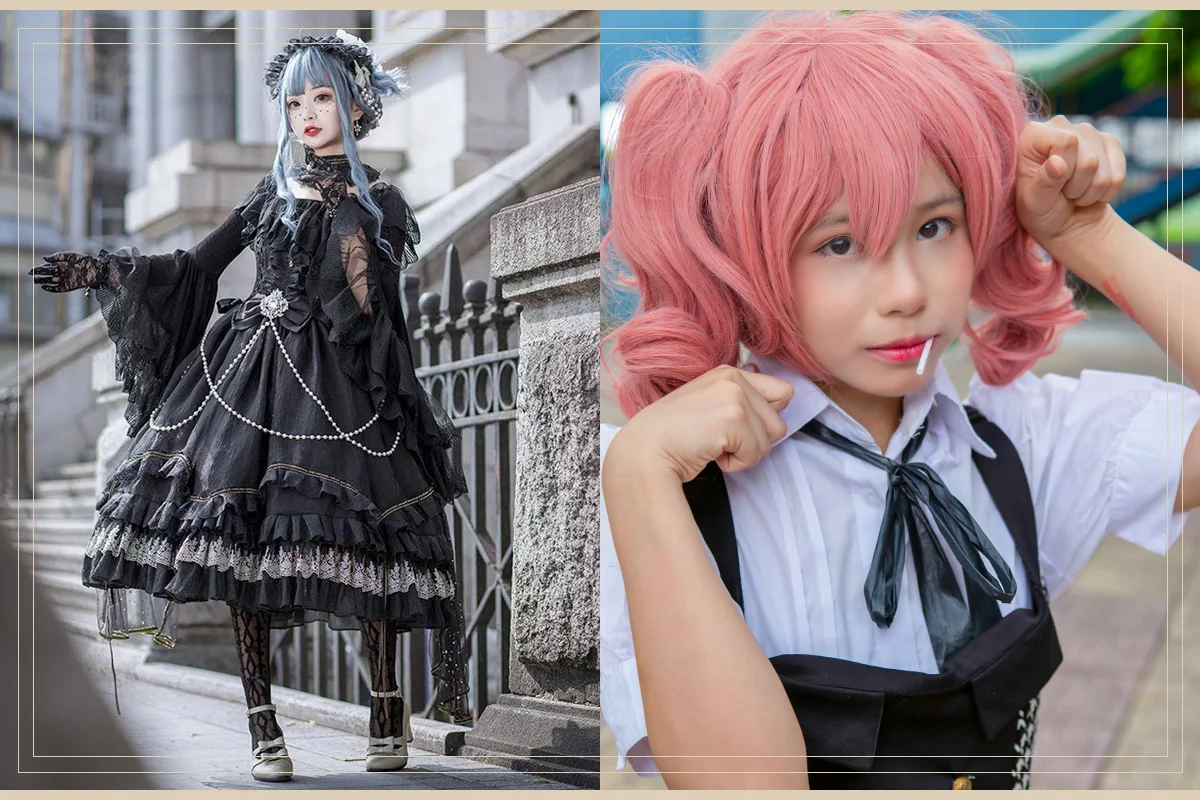
two women wearing lolita harajuku style

  • Lolita: 


Don't let the name fool you – Lolita fashion is anything but childish. Inspired by Victorian children's clothing and infused with a touch of anime aesthetic, Lolita comes in two main flavors: sweet and gothic. Sweet Lolita is all about pastel colors, lace, ruffles, and playful accessories like teddy bears and heart-shaped motifs.

Gothic Lolita, on the other hand, embraces darker tones, incorporating black lace, crucifixes, and batwing sleeves for a more dramatic effect. Both styles involve meticulously crafted dresses, elaborate hairstyles, and a focus on maintaining a youthful, doll-like silhouette.

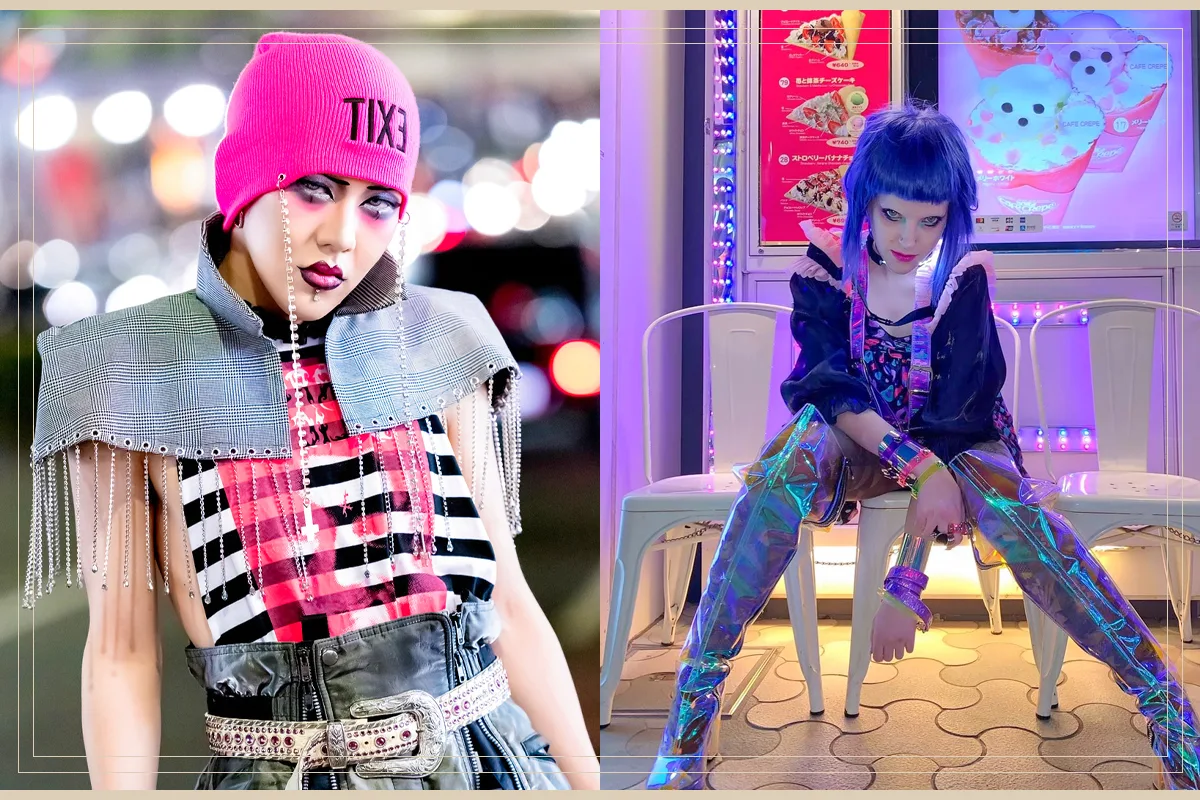
two women wearing cyberpunk harajuku style

  • Cyberpunk: 


Embrace the future with Harajuku's take on Cyberpunk aesthetic. Inspired by science fiction and dystopian narratives, this style incorporates elements like metallic fabrics, holographic prints, neon lights, and tech-inspired accessories. Think vinyl jackets adorned with wires and LED lights, gas mask-inspired respirators, and chunky platform boots with industrial buckles. Cyberpunk fashion is a statement about technology's influence on our world and a celebration of the unconventional.

two women wearing visual kei harajuku style

  • Visual Kei: 


Bold, dramatic, and often androgynous, Visual Kei is a flamboyant style heavily influenced by Japanese rock music. Think elaborate makeup with dramatic eyeliner, brightly colored hair (often defying natural tones), and unique clothing that pushes the boundaries of gender norms. Lace, leather, fishnet stockings, and statement jewelry are all common elements. Visual Kei is about creating a captivating persona and blurring the lines between reality and performance art.

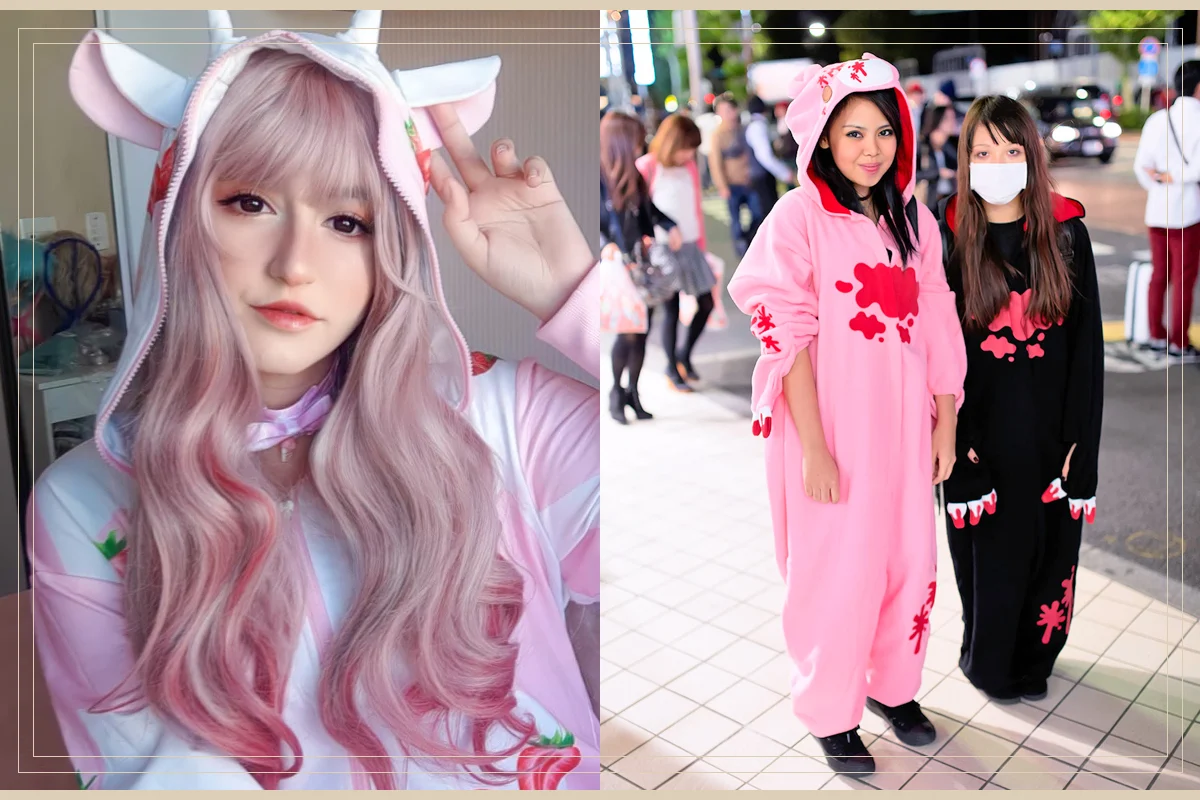
two women wearing kigurumi harajuku style

  • Kigurumi: 


Ever dreamed of dressing up as your favorite animal or cartoon character? Kigurumi lets you do exactly that! Kigurumi translates to "costume" and refers to full-body pajamas made to resemble various characters. From adorable animal onesies to elaborate anime costumes, Kigurumi allows people to express their inner child and embrace the fun side of fashion.

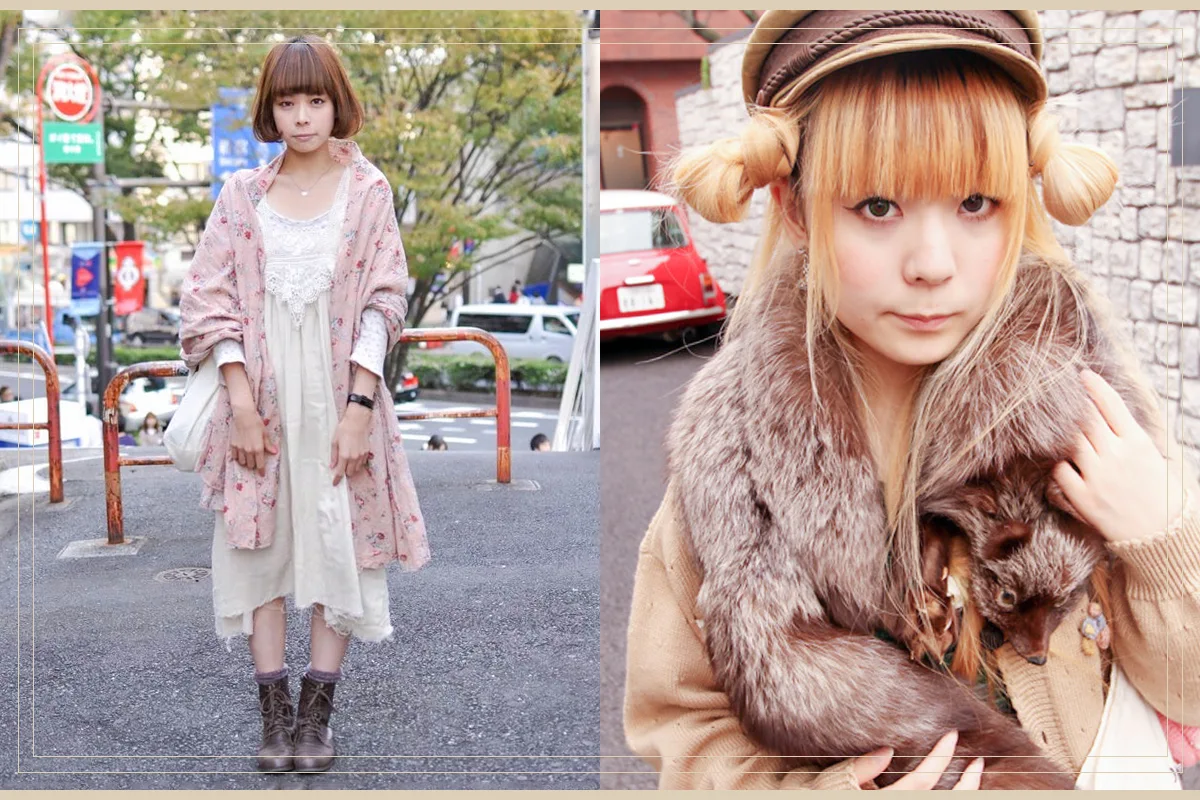
two women wearing mori key harajuku style

  • Mori Kei: 


Embrace the whimsical charm of nature with Mori Kei, which translates to "Forest Girl" style. This nature-based aesthetic evokes a sense of woodland magic, featuring flowing, earth-toned garments with lace, ruffles, and floral prints. Think long, layered dresses in shades of green, brown, and beige, accessorized with straw hats, wooden accents, and nature-inspired jewelry. Mori Kei is perfect for those who want to connect with the beauty of the natural world.

Beyond the Styles: The Heart of Harajuku


Harajuku fashion is more than just clothing; it's a culture, a community, and a way of life. It's about celebrating individuality, pushing boundaries, and having fun with fashion. Here are some additional things to know about Harajuku:

  • The Streets of Harajuku: The heart of Harajuku fashion lies in the iconic Takeshita-dori street, lined with shops selling the latest trends and vintage finds. Omoide Yokocho, a labyrinthine alleyway, offers a treasure trove of unique boutiques and hidden gems.

  • The Tribes: Harajuku is home to various fashion tribes, each with its own distinct style. These tribes often gather on weekends to showcase their outfits, creating a vibrant and visually stunning display.

  • The DIY Spirit: Many Harajuku enthusiasts embrace a DIY approach to fashion, customizing clothes, making their own accessories, and creating one-of-a-kind pieces.

Celebrities Wearing Harajuku Style: Gwen Stefani, Zendaya and Katty Perry

Fashion Icons Inspired by Harajuku


From the world of music, pop icons like Gwen Stefani and Rihanna are known for incorporating vibrant colors, playful patterns, and layered textures into their looks, echoing the energy of Harajuku. Even actors like Zendaya and Ezra Miller have embraced the trend, stepping out in eye-catching ensembles that blend high fashion with quirky accessories, a signature of the Harajuku street style fashion.

Fashion icons like Sarah Jessica Parker and Katy Perry also have dipped their toes into the Harajuku aesthetic, rocking platform shoes, quirky accessories, and cutesy silhouettes with a touch of edgy glam.

Summary...


Harajuku fashion is more than just a collection of outlandish styles; it's a cultural phenomenon that continues to inspire and captivate audiences worldwide. It's a testament to the power of self-expression, a celebration of individuality, and a constant push towards the boundaries of fashion.
  • May 10, 2024

Harajuku Fashion: Top 5 Must-See Styles That Will Blow Your Mind

collage with three women wearing harajuku street style outfits

Harajuku, the vibrant neighborhood in Tokyo, Japan, has long been a melting pot of creativity, eccentricity, and innovation, particularly in the realm of fashion. Renowned worldwide for its avant-garde styles, Harajuku fashion has become a global phenomenon, influencing designers, artists, and fashion enthusiasts alike. In this article, we'll delve into the kaleidoscopic world of Harajuku fashion and uncover five must-see styles that encapsulate its alt spirit.

A Brief Look at Harajuku


Harajuku's journey from a pedestrian street to a global fashion icon is a vibrant story. Once a quiet neighborhood in Tokyo, it blossomed in the post-war era as a haven for youthful self-expression. Teenagers, fueled by newfound prosperity and a desire to break free from conformity, embraced unique, often outlandish styles. This explosion of creativity, fueled by thrift stores and vintage finds, became the "Harajuku phenomenon" – a movement that challenged fashion norms and continues to inspire the world.

Top 5 Must-See Harajuku Fashion Styles That Will Blow Your Mind

two women wearing lolita harajuku style

  • Lolita: 


Don't let the name fool you – Lolita fashion is anything but childish. Inspired by Victorian children's clothing and infused with a touch of anime aesthetic, Lolita comes in two main flavors: sweet and gothic. Sweet Lolita is all about pastel colors, lace, ruffles, and playful accessories like teddy bears and heart-shaped motifs.

Gothic Lolita, on the other hand, embraces darker tones, incorporating black lace, crucifixes, and batwing sleeves for a more dramatic effect. Both styles involve meticulously crafted dresses, elaborate hairstyles, and a focus on maintaining a youthful, doll-like silhouette.

two women wearing cyberpunk harajuku style

  • Cyberpunk: 


Embrace the future with Harajuku's take on Cyberpunk aesthetic. Inspired by science fiction and dystopian narratives, this style incorporates elements like metallic fabrics, holographic prints, neon lights, and tech-inspired accessories. Think vinyl jackets adorned with wires and LED lights, gas mask-inspired respirators, and chunky platform boots with industrial buckles. Cyberpunk fashion is a statement about technology's influence on our world and a celebration of the unconventional.

two women wearing visual kei harajuku style

  • Visual Kei: 


Bold, dramatic, and often androgynous, Visual Kei is a flamboyant style heavily influenced by Japanese rock music. Think elaborate makeup with dramatic eyeliner, brightly colored hair (often defying natural tones), and unique clothing that pushes the boundaries of gender norms. Lace, leather, fishnet stockings, and statement jewelry are all common elements. Visual Kei is about creating a captivating persona and blurring the lines between reality and performance art.

two women wearing kigurumi harajuku style

  • Kigurumi: 


Ever dreamed of dressing up as your favorite animal or cartoon character? Kigurumi lets you do exactly that! Kigurumi translates to "costume" and refers to full-body pajamas made to resemble various characters. From adorable animal onesies to elaborate anime costumes, Kigurumi allows people to express their inner child and embrace the fun side of fashion.

two women wearing mori key harajuku style

  • Mori Kei: 


Embrace the whimsical charm of nature with Mori Kei, which translates to "Forest Girl" style. This nature-based aesthetic evokes a sense of woodland magic, featuring flowing, earth-toned garments with lace, ruffles, and floral prints. Think long, layered dresses in shades of green, brown, and beige, accessorized with straw hats, wooden accents, and nature-inspired jewelry. Mori Kei is perfect for those who want to connect with the beauty of the natural world.

Beyond the Styles: The Heart of Harajuku


Harajuku fashion is more than just clothing; it's a culture, a community, and a way of life. It's about celebrating individuality, pushing boundaries, and having fun with fashion. Here are some additional things to know about Harajuku:

  • The Streets of Harajuku: The heart of Harajuku fashion lies in the iconic Takeshita-dori street, lined with shops selling the latest trends and vintage finds. Omoide Yokocho, a labyrinthine alleyway, offers a treasure trove of unique boutiques and hidden gems.

  • The Tribes: Harajuku is home to various fashion tribes, each with its own distinct style. These tribes often gather on weekends to showcase their outfits, creating a vibrant and visually stunning display.

  • The DIY Spirit: Many Harajuku enthusiasts embrace a DIY approach to fashion, customizing clothes, making their own accessories, and creating one-of-a-kind pieces.

Celebrities Wearing Harajuku Style: Gwen Stefani, Zendaya and Katty Perry

Fashion Icons Inspired by Harajuku


From the world of music, pop icons like Gwen Stefani and Rihanna are known for incorporating vibrant colors, playful patterns, and layered textures into their looks, echoing the energy of Harajuku. Even actors like Zendaya and Ezra Miller have embraced the trend, stepping out in eye-catching ensembles that blend high fashion with quirky accessories, a signature of the Harajuku street style fashion.

Fashion icons like Sarah Jessica Parker and Katy Perry also have dipped their toes into the Harajuku aesthetic, rocking platform shoes, quirky accessories, and cutesy silhouettes with a touch of edgy glam.

Summary...


Harajuku fashion is more than just a collection of outlandish styles; it's a cultural phenomenon that continues to inspire and captivate audiences worldwide. It's a testament to the power of self-expression, a celebration of individuality, and a constant push towards the boundaries of fashion.
collage with goth nail designs

Calling all darklings, night owls, and lovers of the unconventional! Does your heart sing for a manicure that's as bold and dramatic as your soul? While Halloween nails definitely capture some gothic vibes, we can't be rocking them all year round, especially when there are so many undiscovered dark-themed designs waiting to be explored. Let's ditch the orange pumpkins and embrace the allure of truly goth nail designs.

Here are five killer ideas that combine the edgy spirit of goth with a touch of unexpected prettiness. Get ready to turn heads and unleash your inner darkness (in the most stylish way possible, of course).

Goth Aesthetic + Nail Art 


Goth nail art embodies the dark and dramatic spirit of the subculture. Deep, sultry colors like black, crimson, and midnight blue form the base, often accented with bold patterns like spiderwebs, crosses, or even delicate lace. While the overall look leans dark, a touch of elegance keeps it from being purely macabre. Think shimmering metallics, intricate nail art designs, or even a single, perfectly placed jewel for a touch of unexpected refinement.

close up of two womans hands with Stained Glass Nails
by @chaunlegend

  • #1. Stained Glass Nails: 


Clear base with intricate stained glass pattern, inspired by the holy vitrage in the church.

Let's start with an alluring, vitrage-inspired nail look for all the Church Aesthetic appreciators. Get the look by playing with vibrant jewel tones and metallic outlines to create the illusion of miniature stained glass masterpieces on each nail. This dazzling look is sure to turn heads but be warned – achieving those perfect details requires a steady hand and some nail art practice, making it best suited for the more experienced nail enthusiast.

How to Create the Stained Glass Effect on Your Nails

Translucent foundation: Apply a thin layer of clear or slightly translucent nail polish as the base for your stained glass design. Let it dry completely.

Web of colors:  Using your thin nail art brush, carefully paint a network of geometric shapes and lines on your nails. Play with different colors and experiment with creating sections of varying sizes.

Metallic accents (optional):  For an extra touch of stained glass authenticity, dip your dotting tool (or the tip of your thin brush) in a metallic polish and add small dots or outlines to your colored sections.

Filling the gaps: Once your web of lines is complete, use your chosen colors to fill in the sections you created. Be patient and use thin layers for better control.

Seal the deal:  After everything is dry, apply a generous layer of top coat to protect your artwork and add a beautiful shine.

close up of two womans hands with Insectarium Exhibition Nail Design for goths
by Superset Nail Design

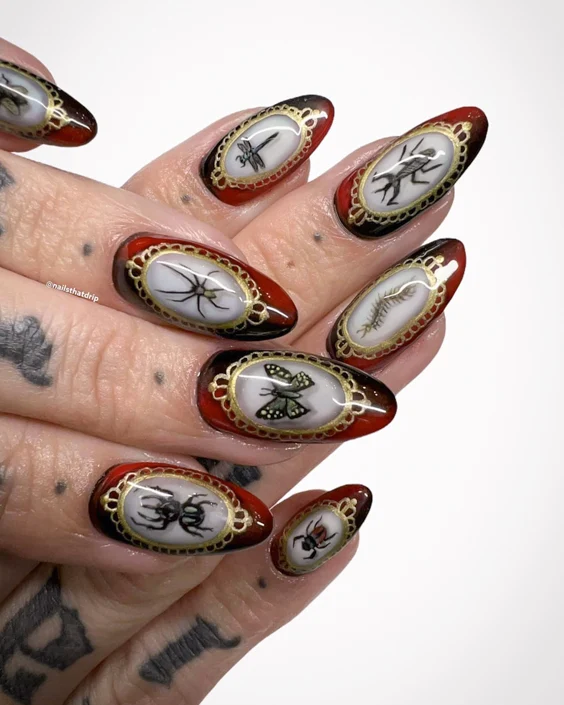
#2. Insectarium Exhibition Nail Design: 


Deep red and black base with a gold oval shape and a small insect on a white background.

If stained glass nails don't appeal to you, try to channel your inner entomologist with the captivating "Insectarium Exhibition" nail design. Imagine a museum display brought to life at your fingertips. Start with a base of deep, luxurious red – a color reminiscent of the plush velvet lining in antique insect displays. Then, on each nail, paint a bold black oval in the center, creating a window into a miniature world. 

Paint a delicate white background, and then the star of the show – a tiny, intricately detailed insect. Choose a realistic beetle, a graceful butterfly, or a curious spider – the possibilities are endless. 

How to Create the Insectarium Nails

Prepped and Polished: Apply a base coat to clean, and dry nails. Let it dry completely, then paint two thin coats of your deep red polish for an opaque and luxurious base.

The Insectarium Window: Using your black polish and a thin nail art brush, carefully paint a clean oval shape in the center of each nail. This will act as the "window" into your miniature insect exhibit. Let the black dry completely.

A Blank Canvas: Within the black oval, use your white polish to create a small, clean rectangle or circle as the background for your insect.

Star of the Show: Now comes the fun part!  Using your thin nail art brush, meticulously paint a small insect of your choice onto the white background. You can find inspiration online or in insect field guides for realistic details.

Metallic Accents (Optional): For an extra touch of realism and dimension, grab your dotting tool (or the tip of a bobby pin) and dip it into your gold polish. Carefully add tiny dots for details like eyes or spots on the wings of your insect.

Seal the Deal: Once everything is completely dry, apply a generous layer of top coat to protect your miniature insectarium and add a beautiful glossy finish.

*Extra tip: Take your Insectarium-inspired goth nails to the next level by incorporating subtle 3D elements. After painting the base insect, use a dotting tool and a metallic gold polish to create tiny, raised dots for details like eyes or spots on the wings. 

close up of two womans hands with  Joan of Arc Nail Look for Orléans' Goths design

#3. Joan of Arc Nail Look for Orléans' Goths:


See-through stiletto nails with "stainless steel" swords painted on.

The next goth look is giving out a medical, slightly aggressive, but romantically beautiful vibe. I called them Joan of Arc nails and I love this look so much! I wish my hands were steady, so I could re-create this design on my sharpies. 

How to Create the Joan of Arc Nail Design?

Prep is Key:  Start with clean, dry nails. Gently push back your cuticles and apply a base coat for better polish adherence.  Let it dry completely.  For an extra touch of subtle color, you can apply one thin coat of clear or sheer nude polish after the base coat dries. 

Stiletto Statement: If you don't already have stiletto nails, consider getting them shaped professionally for this look. You can also use acrylic or press-on nails in a stiletto shape if that's more convenient. 

Sword Art: Here comes the fun part! Using your thin nail art brush and the chrome or holographic silver polish, carefully paint the silhouette of a sword on each nail. Aim for a long, slender shape that tapers towards the tip, mimicking a medieval blade. 

*Beginner Tip: If you're not confident in freehand drawing, you can find nail art stencils online that feature sword designs. Simply apply the stencil to your nail, paint over it with your silver polish, and then carefully peel off the stencil for a clean design. 

Polish and Shine: Once the sword art is dry, apply a top coat (optional) for added protection and a beautiful glossy finish.

close up of two womans hands with Black Intricate Lace design

#4. Black Intricate Lace on Purple Nails:


Muted, matte-purple base with a thin, intense-black lace woven on top.

Just check out this captivating blend of elegance and gothic edge. A base of muted, matte purple – a color that whispers of twilight skies and hidden secrets. This velvety backdrop will be the canvas for an exquisite masterpiece. Somewhat less dramatic, and more daytime-appropriate!

How to Create Black Lace Nail Design?

Prep and Prime: Apply a base coat to clean, dry nails and let it dry completely. This will help with polish adherence and prevent chipping.

Muted Majesty: Paint two thin coats of your matte purple nail polish, ensuring even coverage for a smooth and opaque finish. Dry each nail polish coat completely before the next.

Weaving the Lace: Here comes the intricate part! Using your thin nail art brush, carefully paint a design resembling black lace onto each nail. You can create delicate floral patterns, swirling vines, geometric shapes, or even find inspiration from real lace patterns online.

Beginner Tip: If you're new to nail art or find freehand drawing challenging, consider using a stamping kit. You can find nail stamping plates with intricate lace designs that can be easily transferred onto your nails using a stamper and scraper.

Level Up Your Lace (Optional): For a truly detailed look, especially with very intricate designs, you can utilize a detailing brush. This allows for even finer lines and sharper details compared to a regular nail art brush.

Seal the Deal (Optional): Since the look utilizes a matte purple base, you may prefer to keep the overall finish matte. However, if you desire a bit of shine, apply a thin layer of top coat after everything is dry. This will also help protect your intricate lace design.

close up of two womans hands with Nephrite and Silver Goth look

  • #5. Nephrite and Silver Goth Nails:


Marble-like, milky-green base with white "veins" and silver crosses, blings, and raw gems all over the nails.

And, lastly, here are Nephrite and Silver goth nails, for those who like nature's gifts and drama! This mesmerizing look draws inspiration from the beauty and mystery of nephrite jade, a stone prized for its ethereal green hues and connection to the spirit world in many cultures. Delicate silver crosses, tiny sparkling "blings" (small rhinestones or studs), and even small, raw nephrite chips can be incorporated, creating a sense of both luxury and raw, dark aesthetic.

How to Create Nephrite and Silver Goth Nails?

Prep and Base: Apply a base coat to clean it and let it dry completely.

Milky Jade Canvas: Paint two thin coats of your milky green nail polish, ensuring even coverage for an opaque and smooth base that resembles polished nephrite jade. Let each coat dry completely before applying the next.

Swirling Veins: Using your thin nail art brush and white nail polish, carefully paint thin, wispy lines across each nail. These lines should resemble veins or natural markings within the stone and can be swirled or left relatively straight – there's no need for perfect symmetry here!

Silver Accents (Optional): If you want to incorporate silver crosses, dip your thin nail art brush in silver polish and carefully draw small crosses on specific nails or accentuate the white vein intersections with tiny silver dots.

Bling It On: Now comes the fun part – adding the gothic touch!  Using tweezers, carefully pick up small silver rhinestones or studs and place them strategically on your nails. Play with size and placement for a unique look.

*Tip: Apply a tiny dot of top coat to the back of each rhinestone or stud before placing it for better adhesion.

Raw Beauty (Optional): For an extra dose of gothic flair and to mimic the inclusion of raw gemstones, use tweezers to gently place a few tiny crushed nephrite chips onto your nails.  Press them lightly into the polish to ensure they adhere.

Seal the Deal: Once everything is dry and in place, apply a generous layer of top coat to seal your design and protect all the embellishments. This will also create a beautiful, glossy finish.

Let's Wrap Up...


So there you have it, darklings! Five killer goth nail designs that combine the boldness you crave with a touch of unexpected prettiness. With a little practice and the tutorials provided, you can transform your fingertips into mini works of gothic art
  • May 01, 2024

Goth Nail Designs: 5 Edgy, but Pretty Ideas for All the Darklings (with Tutorials!)

collage with goth nail designs

Calling all darklings, night owls, and lovers of the unconventional! Does your heart sing for a manicure that's as bold and dramatic as your soul? While Halloween nails definitely capture some gothic vibes, we can't be rocking them all year round, especially when there are so many undiscovered dark-themed designs waiting to be explored. Let's ditch the orange pumpkins and embrace the allure of truly goth nail designs.

Here are five killer ideas that combine the edgy spirit of goth with a touch of unexpected prettiness. Get ready to turn heads and unleash your inner darkness (in the most stylish way possible, of course).

Goth Aesthetic + Nail Art 


Goth nail art embodies the dark and dramatic spirit of the subculture. Deep, sultry colors like black, crimson, and midnight blue form the base, often accented with bold patterns like spiderwebs, crosses, or even delicate lace. While the overall look leans dark, a touch of elegance keeps it from being purely macabre. Think shimmering metallics, intricate nail art designs, or even a single, perfectly placed jewel for a touch of unexpected refinement.

close up of two womans hands with Stained Glass Nails
by @chaunlegend

  • #1. Stained Glass Nails: 


Clear base with intricate stained glass pattern, inspired by the holy vitrage in the church.

Let's start with an alluring, vitrage-inspired nail look for all the Church Aesthetic appreciators. Get the look by playing with vibrant jewel tones and metallic outlines to create the illusion of miniature stained glass masterpieces on each nail. This dazzling look is sure to turn heads but be warned – achieving those perfect details requires a steady hand and some nail art practice, making it best suited for the more experienced nail enthusiast.

How to Create the Stained Glass Effect on Your Nails

Translucent foundation: Apply a thin layer of clear or slightly translucent nail polish as the base for your stained glass design. Let it dry completely.

Web of colors:  Using your thin nail art brush, carefully paint a network of geometric shapes and lines on your nails. Play with different colors and experiment with creating sections of varying sizes.

Metallic accents (optional):  For an extra touch of stained glass authenticity, dip your dotting tool (or the tip of your thin brush) in a metallic polish and add small dots or outlines to your colored sections.

Filling the gaps: Once your web of lines is complete, use your chosen colors to fill in the sections you created. Be patient and use thin layers for better control.

Seal the deal:  After everything is dry, apply a generous layer of top coat to protect your artwork and add a beautiful shine.

close up of two womans hands with Insectarium Exhibition Nail Design for goths
by Superset Nail Design

#2. Insectarium Exhibition Nail Design: 


Deep red and black base with a gold oval shape and a small insect on a white background.

If stained glass nails don't appeal to you, try to channel your inner entomologist with the captivating "Insectarium Exhibition" nail design. Imagine a museum display brought to life at your fingertips. Start with a base of deep, luxurious red – a color reminiscent of the plush velvet lining in antique insect displays. Then, on each nail, paint a bold black oval in the center, creating a window into a miniature world. 

Paint a delicate white background, and then the star of the show – a tiny, intricately detailed insect. Choose a realistic beetle, a graceful butterfly, or a curious spider – the possibilities are endless. 

How to Create the Insectarium Nails

Prepped and Polished: Apply a base coat to clean, and dry nails. Let it dry completely, then paint two thin coats of your deep red polish for an opaque and luxurious base.

The Insectarium Window: Using your black polish and a thin nail art brush, carefully paint a clean oval shape in the center of each nail. This will act as the "window" into your miniature insect exhibit. Let the black dry completely.

A Blank Canvas: Within the black oval, use your white polish to create a small, clean rectangle or circle as the background for your insect.

Star of the Show: Now comes the fun part!  Using your thin nail art brush, meticulously paint a small insect of your choice onto the white background. You can find inspiration online or in insect field guides for realistic details.

Metallic Accents (Optional): For an extra touch of realism and dimension, grab your dotting tool (or the tip of a bobby pin) and dip it into your gold polish. Carefully add tiny dots for details like eyes or spots on the wings of your insect.

Seal the Deal: Once everything is completely dry, apply a generous layer of top coat to protect your miniature insectarium and add a beautiful glossy finish.

*Extra tip: Take your Insectarium-inspired goth nails to the next level by incorporating subtle 3D elements. After painting the base insect, use a dotting tool and a metallic gold polish to create tiny, raised dots for details like eyes or spots on the wings. 

close up of two womans hands with  Joan of Arc Nail Look for Orléans' Goths design

#3. Joan of Arc Nail Look for Orléans' Goths:


See-through stiletto nails with "stainless steel" swords painted on.

The next goth look is giving out a medical, slightly aggressive, but romantically beautiful vibe. I called them Joan of Arc nails and I love this look so much! I wish my hands were steady, so I could re-create this design on my sharpies. 

How to Create the Joan of Arc Nail Design?

Prep is Key:  Start with clean, dry nails. Gently push back your cuticles and apply a base coat for better polish adherence.  Let it dry completely.  For an extra touch of subtle color, you can apply one thin coat of clear or sheer nude polish after the base coat dries. 

Stiletto Statement: If you don't already have stiletto nails, consider getting them shaped professionally for this look. You can also use acrylic or press-on nails in a stiletto shape if that's more convenient. 

Sword Art: Here comes the fun part! Using your thin nail art brush and the chrome or holographic silver polish, carefully paint the silhouette of a sword on each nail. Aim for a long, slender shape that tapers towards the tip, mimicking a medieval blade. 

*Beginner Tip: If you're not confident in freehand drawing, you can find nail art stencils online that feature sword designs. Simply apply the stencil to your nail, paint over it with your silver polish, and then carefully peel off the stencil for a clean design. 

Polish and Shine: Once the sword art is dry, apply a top coat (optional) for added protection and a beautiful glossy finish.

close up of two womans hands with Black Intricate Lace design

#4. Black Intricate Lace on Purple Nails:


Muted, matte-purple base with a thin, intense-black lace woven on top.

Just check out this captivating blend of elegance and gothic edge. A base of muted, matte purple – a color that whispers of twilight skies and hidden secrets. This velvety backdrop will be the canvas for an exquisite masterpiece. Somewhat less dramatic, and more daytime-appropriate!

How to Create Black Lace Nail Design?

Prep and Prime: Apply a base coat to clean, dry nails and let it dry completely. This will help with polish adherence and prevent chipping.

Muted Majesty: Paint two thin coats of your matte purple nail polish, ensuring even coverage for a smooth and opaque finish. Dry each nail polish coat completely before the next.

Weaving the Lace: Here comes the intricate part! Using your thin nail art brush, carefully paint a design resembling black lace onto each nail. You can create delicate floral patterns, swirling vines, geometric shapes, or even find inspiration from real lace patterns online.

Beginner Tip: If you're new to nail art or find freehand drawing challenging, consider using a stamping kit. You can find nail stamping plates with intricate lace designs that can be easily transferred onto your nails using a stamper and scraper.

Level Up Your Lace (Optional): For a truly detailed look, especially with very intricate designs, you can utilize a detailing brush. This allows for even finer lines and sharper details compared to a regular nail art brush.

Seal the Deal (Optional): Since the look utilizes a matte purple base, you may prefer to keep the overall finish matte. However, if you desire a bit of shine, apply a thin layer of top coat after everything is dry. This will also help protect your intricate lace design.

close up of two womans hands with Nephrite and Silver Goth look

  • #5. Nephrite and Silver Goth Nails:


Marble-like, milky-green base with white "veins" and silver crosses, blings, and raw gems all over the nails.

And, lastly, here are Nephrite and Silver goth nails, for those who like nature's gifts and drama! This mesmerizing look draws inspiration from the beauty and mystery of nephrite jade, a stone prized for its ethereal green hues and connection to the spirit world in many cultures. Delicate silver crosses, tiny sparkling "blings" (small rhinestones or studs), and even small, raw nephrite chips can be incorporated, creating a sense of both luxury and raw, dark aesthetic.

How to Create Nephrite and Silver Goth Nails?

Prep and Base: Apply a base coat to clean it and let it dry completely.

Milky Jade Canvas: Paint two thin coats of your milky green nail polish, ensuring even coverage for an opaque and smooth base that resembles polished nephrite jade. Let each coat dry completely before applying the next.

Swirling Veins: Using your thin nail art brush and white nail polish, carefully paint thin, wispy lines across each nail. These lines should resemble veins or natural markings within the stone and can be swirled or left relatively straight – there's no need for perfect symmetry here!

Silver Accents (Optional): If you want to incorporate silver crosses, dip your thin nail art brush in silver polish and carefully draw small crosses on specific nails or accentuate the white vein intersections with tiny silver dots.

Bling It On: Now comes the fun part – adding the gothic touch!  Using tweezers, carefully pick up small silver rhinestones or studs and place them strategically on your nails. Play with size and placement for a unique look.

*Tip: Apply a tiny dot of top coat to the back of each rhinestone or stud before placing it for better adhesion.

Raw Beauty (Optional): For an extra dose of gothic flair and to mimic the inclusion of raw gemstones, use tweezers to gently place a few tiny crushed nephrite chips onto your nails.  Press them lightly into the polish to ensure they adhere.

Seal the Deal: Once everything is dry and in place, apply a generous layer of top coat to seal your design and protect all the embellishments. This will also create a beautiful, glossy finish.

Let's Wrap Up...


So there you have it, darklings! Five killer goth nail designs that combine the boldness you crave with a touch of unexpected prettiness. With a little practice and the tutorials provided, you can transform your fingertips into mini works of gothic art